Plaster Casts, Corsets, and Beds
Historical document, translated for reference. It reflects medical knowledge of the 1920s–30s and is not medical advice.
Summary
This 1930s encyclopedia article discusses the application, techniques, and medical uses of plaster of Paris bandages, casts, corsets, and beds in orthopedic surgery and trauma care.
Encyclopedia article (1928–1936)
PLASTER CASTS, CORSETS, AND BEDS are so frequently applicable in various orthopedic and surgical procedures that Hoffa (Noyes) calls plaster casts the "soul of orthopedics." Their field of application includes all those diseases where fixation and immobilization of a limb or the spine are indicated. Plaster work performed on a limb is called a plaster cast on the trunk, or a corset or bed depending on the shape. Most commonly this work is performed with plaster bandages, less often with plaster splints, and sometimes both are used.-Plaster bandages (not more than 3 m in length) are made of white, soft, clean gauze of various widths, depending on the purpose of the bandage. The rubbing of plaster into the gauze and the rolling of the bandage are done by hand.-Splints are prepared from strips of gauze corresponding to the width and length of the part of the body they are to cover; plaster is also rubbed into them. A splint consists of 5 to 6 thin gauze layers. When applying a plaster cast, one must take care that it tightly embraces the limb, accurately repeats its shape, does not press, is durable, and not too heavy. As a rule, plaster casts are applied to a cleanly washed body. Sometimes the plaster is applied directly to the skin. Usually, for an interstice between it and the skin, padding is used (medium-thickness tricot, whether an undershirt, stockings, etc.), and in addition, protruding bones are covered with pieces of cotton wool to avoid bedsores. Instead of tricot, one can use a gauze bandage (bandaged evenly, in 2 layers), "Vienna cotton," which is well separated into layers, as well as corrugated paper bandages. In thin subjects, to avoid bedsores, the entire region to be plastered must be bandaged with non-absorbent cotton wool bandages, and cotton rings should be placed on protruding bones. When the skin coverage is complete and the limb is given the desired position depending on medical indications, the plaster bandages are soaked in water in a basin. For quick hardening of the bandage, not very hot water is used, and for slow hardening, lukewarm water (for large bandages, slow drying is required). The bandage is taken into the hands only when it is soaked, and is wrung out lightly with both hands by the ends. It is always advisable to bandage from the periphery to the center. The first turns of the bandage, covering the area designated for plastering, are applied loosely so as not to cut in. The second bandage and subsequent ones, especially in obese patients, are bandaged tightly and smoothed out all the time so that the individual turns of the bandages merge into a single mass and accurately contour the body shape, i.e., modeling of the bandage is performed. Plaster bandages must be applied with such calculation that the bandage in all its places has a certain number of plaster layers (6-10-12), i.e., in places more subject to fracture, it is thicker, and in less subject ones, thinner: this achieves its strength and lightness. On the lower extremities, if it is necessary to fix the foot, a plaster cast is applied starting from the toes (from the sole side it should be longer than the toes) and reaches the knee. If in addition it is necessary to fix the ankle joint and the lower part of the leg, the plaster cast must extend to the middle of the thigh. For fixation of the knee, a bandage from the ankles to the top of the thigh is rarely sufficient. For complete fixation, it is necessary to make a cast with a pelvic ring. A general rule of complete fixation is the plastering of two adjacent joints. It is most difficult to fix the upper part of the thigh, especially when it is necessary to maintain a certain abduction of the leg; in these cases, a cast with a so-called "trouser leg" on the healthy leg is applied. Bandages are especially fragile over the joints, and these places need to be strengthened more strongly either with extra turns of the bandage or with splints (see Figure 1) among the layers of the bandage. When the bandage is finished and slightly dried, its edges are trimmed with a knife so that they are smooth and to expose, for example, the toes and the epigastric region. On the upper extremities, bandages are applied according to the same principles; a special feature is the bandage for fixing the shoulder joint (see Figure 2), which consists of a corset, a plaster cast on the arm, and a strut between them.-The stage plaster cast is applied to the limbs in order to eliminate flexion contractures. Knee joint: 1) A plaster cast is applied upward along the thigh from the knee joint and captures the pelvis; 2) from the toes of the foot to the knee so that between the upper and lower cast there remains
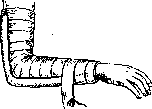
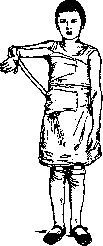
Figure 1. Fig. only a gap above the knee joint; 3) when both casts have hardened, the doctor takes the plaster cast on the lower leg and raises it upward as much as possible without pain. The patient lies on the table on his back so that the casted thigh lies on the table only by its upper half, which the assistant presses to the table, the rest of the leg remains suspended in the hands of the doctor. After the possible straightening of the contracture, the gap between the upper and lower plaster casts is filled with cotton wool and covered with a piece of gauze, which also covers a part of the upper and lower casts. Over it is placed another plaster cast, serving as a connecting sleeve for the upper and lower casts. (All this is done by a third person.) The gauze is tucked in so that at the next stage (after 2 weeks) it is easy to remove the connecting plaster sleeve and produce the next straightening of the contracture. To avoid subluxation, the lower leg should be lifted not by the heel, but by taking the upper part of the lower leg and not only pulling upward, but also longitudinally (firm fixation of the thigh against the table is necessary, as indicated above) until the pain is tolerable for the patient, and again fixing the improved position with the connecting plaster sleeve, i.e., the upper and lower casts. Three to four stages are enough to straighten contractures of no more than a right angle. The plaster corset is applied for diseases, injuries, and curvatures of the spine. Plaster corsets are made: low (Solovyov), with shoulders (Lange; see Figure 3), corset with a collar (Calot; see Figure 4), collar
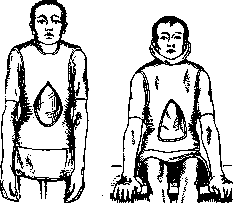
Figure 3.
Figure (Calot; see Figure 5). The low plaster corset is used for lesions of the vertebra below the VIII thoracic; the corset with a collar is used for processes above the VI-VII thoracic vertebrae, and the corset with shoulders is intermediate. In children, it is preferable to apply a corset with shoulders. The plaster corset is applied more often in the standing position of the patient, less often in the sitting position, and very rarely in the lying position. The patient is placed in a special frame (see Figure 6) and pulled up by the arms or by the neck (when applying the collar and corset with shoulders). Traction is applied only until the patient can touch the floor with their heels. The pelvis under the pubis is fixed with a belt (see Figure 6, a).

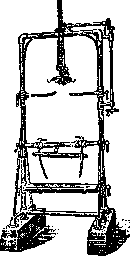
Fig.
Figure 6. The patient is installed straight in the sagittal direction; in the frontal direction, the installation can be different, preferably without tilt. The plaster corset is applied over tricot, cotton wool, etc. The doctor must stand facing the patient when applying the corset in order to better regulate the tightening of the bandage
of the corset and observe the condition of the patient (fainting occurs). If there is a hump, then elastic cotton rolls are placed on its sides to protect the hump from bedsores. Bandaging begins from the bottom up, smoothing all the time. Tightly on the pelvis and waist of the patient and loosely on the chest. After applying a sufficient number of bandage turns (6-12 layers), as it dries, the corset is modeled, especially modeling on the pelvic bones, waist, and
lower part of the chest, since when the patient lowers his hands, the chest, expanding, must rest on the corset, and it in turn on the iliac bones of the pelvis, which achieves the unloading of the spine, and in addition, the corset reclines and fixes this position. The hardened corset is cut below along the line of the hip flexion so that one can sit, above at the level of the nipples or higher; above the epigastric region, a cutout is made for the stomach and breathing. The corset with shoulders is also made from the bottom up, but higher, and in addition, the shoulders are also covered with bandage turns, which Figure 7.

Figure 8.
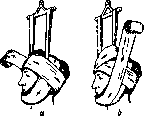
are connected with the corset. The shoulders must be tightly covered with bandages, otherwise they will subsequently lag behind. A corset with a collar begins with the collar (see figure 7, a and b). The chin, neck, and back of the head are covered with a cotton pad in gauze. Suspension by a loop made of a gauze bandage. Cover the hair. The first turn of the bandage goes from the right ear, descends down along the chin and neck, passes to the left side, rises up to the left ear, from here through the scalp, behind the loop, it passes to the right side, goes around the loop, goes in front of it and, descending from the left side of the lower part of the back of the head and neck, goes along the back of the head to the right side, rises up, goes around the loop in front and, turning behind it, returns to the right ear. Repeating such turns 6 times and adding turns around the neck to them, a collar is made, to which the corset is immediately plastered (a difficult task). It is necessary to properly model the chin and the back of the head, upon which the head should rest. A collar without a corset is made only for lesions of the cervical vertebrae. The collar is trimmed along the line of the chin, mastoid processes, and the lower occipital line. Lorenz's plaster bed is applied in the prone position of the patient on a table with the back facing upwards (see figure 8). The back is lordosized. The patient is covered with a layer of cotton wool, and over it with a single layer of clean gauze. Some make beds with plaster bandages, but it is simpler to make them with plaster strips prepared in advance according to the patient's dimensions. First, 1 strip (2 layers of impregnated gauze) is taken, moistened, squeezed out, and smoothed on a board, then placed on the patient, covering the head, smoothed evenly on him along the contours of the head, neck, shoulders, sides, spine (which is straightened as much as possible when positioning the patient), and pelvis; when the bed is made with a leg (if spondylitis and coxitis exist), then on the leg as well. The second strip is also smoothed on a board, and then smoothed on the patient. The remaining strips are smoothed directly on the patient. A total of 6-9 strips. The bed during application is constantly modeled on the indicated places. Figure 9.
On the patient, the cutting line is designated so that the ears, shoulders, and the cutout for defecation are free (see figure 9). The bed is removed from the patient. From the inside, the layer of gauze separating the cotton wool from the first strip is removed, and it is trimmed. Upon drying (2 days), a cotton bedding is placed in it, hemmed with gauze, and the patient can be placed in it. The patient lies on their stomach, is covered with the bed, and then turned over onto their back through the side, for which the patient must be supported under the chest. They are removed, conversely, by turning onto the stomach, also with support. Over time, cotton crosses are placed under the hump for reclination, which are gradually thickened.
Related articles
Cite this page
“Plaster Casts, Corsets, and Beds.” Soviet Medical Encyclopedia. English translation of Bolshaya Meditsinskaya Entsiklopediya, 1st ed. (Moscow, 1928–1936), ed. N. A. Semashko. https://sovietmedicalencyclopedia.pages.dev/article/plaster-casts/