MICROSURGERY
Historical document, translated for reference. It reflects medical knowledge of the 1920s–30s and is not medical advice.
Summary
Microsurgery is a method and technique for performing operations on very small objects such as individual cells using complex microscopes. It encompasses various procedures including microdissection, microinjection, and micromanipulation, with specialized equipment allowing for precise microscopic interventions.
Encyclopedia article (1928–1936)
MINROCYTES, see Macrocytes. MICROSURGERY. Contents: Historical data............317 Apparatus (micromanipulators), instrumentation....................317 General techniques for performing microoperations . 324 Photographing microoperations......325 Microoperations with transmitted light.....326 Ultramicroscopic microsurgery.....327 Examples of application of microsurgical. methodology in various fields of biology and medicine.....327 Microsurgery (from Greek mikros-small and ergon-work), the work, methodology, and technique by which various effects (microoperations) can be produced on very small objects (an individual cell, etc.) at magnifications of a complex microscope. The term "microsurgery" was proposed by Peterfi. A special apparatus with mechanical devices for the finest movements of microinstruments is called a micromanipulator (Peterfi). M., according to Peterfi, is a collective concept for microdissection, microisolation, microinjection, micr vivisection, etc. In contrast to Germany, in America and England the term "microsurgery" is little used; there they most often simply speak of microdissection and microinjection. Recently, 2 major areas of microoperations have been distinguished. 1) Microoperations on somewhat larger objects (approximately the size of sea urchin eggs, entire embryos of early developmental stages, etc.), which are performed under the control of the naked eye or at magnifications of a dissecting loupe (dissecting microscope) without the help of a micromanipulator, with the operator holding microinstruments simply in their hands; these operations are called, according to Spemann (Spe-mann), microsurgical operations. 2) Such microoperations on smaller objects, on individual cells and their parts (sometimes called cell operations-Zelloperationen, M. in the narrow sense), when effects are produced at medium and high magnifications of a complex microscope by means of a micromanipulator. The first are mainly used in developmental mechanics (physiology), the second-for various cytological, microbiological studies, protoplasm research, etc. The necessity of special mechanical devices for microoperations at high magnifications is evident from the fact that the operating field-the field of view of the microscope (with an apochromatic objective 2 mm with compensating eyepiece No. 4) constitutes an area of only 0.035 mm2 (Chambers). If the invention of the microscope made our vision as if more acute, then the invention and improvement of the micromanipulator transformed the relatively coarse movements of our hands into the finest and most precise movements of microinstruments, and all movements of microinstruments can be continuously monitored with the help of a microscope. On the other hand, modern techniques for making microinstruments are such that it allows preparing, for example, a micro needle, the tip of which proves perfect when checked with the highest magnifications of the microscope (especially if the microinstrument is also given final treatment under the microscope with the help of Peterfi's microcauter), or a micropipette, the diameter of whose opening equals 5 μ or even 1-μ/2 μ (Chambers). At present, microsurgical methodology and technique are successfully applied not only in various fields of microbiology (especially for isolating a single cell) and cytology, where methods of M. were first developed, but also for studying the physical and physiological properties of protoplasm, in physical chemistry (for the study of colloids), in experimental zoology (e.g., for removing the nucleus from a fertilized egg of an axolotl in hybridization experiments and obtaining cleavage of enucleated cells), in physiology (for studying the contractions of individual muscle cells, regeneration of nerve fibers, for studying urine secretion by obtaining it directly from renal glomeruli, etc., and for studying the function of blood capillaries, etc.). Historical data. In the old botanical and zoological literature there are scattered individual references to various micromanipulations, various effects on the cell produced directly by hand, in which certain outstanding biologists of the 1860s and 1870s were particularly skilled masters. However, the special technique of microoperations was developed relatively recently. Between 1904 and 1910, McClendon in New York, Barber in Kansas, and Schouten in Holland independently developed techniques that allowed manipulation (operation) with extremely thin glass instruments (needles and pipettes), brought to the object from below, in the field of view of a complex microscope at high magnifications. Schouten (1899) and Barber (1904) applied their technique almost exclusively for isolating microorganisms (individual individuals). For the first time in 1912, Kite, and then Kite Chambers (1912), applied this technique for cytological purposes, for studying the physical properties of protoplasm. Since that time, Chambers, Peterfi, Taylor, and some others have worked particularly much and productively in this field. Apparatus (micromanipulators), instrumentation. For M. are necessary: 1) micromanipulator, 2) microinstruments, 3) operating (wet) chamber and some other devices. 1. Micromanipulators. Among modern micromanipulators, the best are the Peterfi micromanipulator (manufactured by the firm of C. Zeiss) and the Chambers micromanipulator (of the Leitz firm); the Taylor micromanipulator deserves attention for the comparative simplicity of its construction. The Peterfi micromanipulator consists of a wide, massive base (Figure 1), in the middle of which is placed the microscope, and on the sides are firmly fixed 2 operating stands (Figure 1 Вг and Б1) (2 "assistants" in Peterfi's expression), which are the mechanical devices for holding and moving instruments. The microinstrument: its thicker, metal or glass part is held by means of a clamp ik on top of this stand ("assistant"). Each instrument is moved in this micromanipulator with the help of 6 screws, coarse and fine. For lateral ("perilateral") movements (right-left) of the tip of the microinstrument, the following screws serve: coarse / (Figure 1) and fine 1; for vertical movements (up-down)-11 and 4; for sagittal (forward-backward)-rotation of the entire column around the vertical axis simply by hand and fine screw 2; movement (along an arc) from bottom up and vice versa is effected by screw 3. On each side of the micromanipulator there are therefore 6 screws, and in total-12; if we add to this the 2 screws of the movable microscope stage and the 2 screws for the ordinary setup of the microscope (focusing), then in total for performing various manipulations the researcher has at their disposal 16 screws. For each movement there is a coarser screw (cremaller) producing movements noticeable to the naked eye, and a micrometric screw for fine movements at high magnifications. Usually most microoperations (see below) are performed with one or two operating stands; occasionally there arises a need for 1 or 2 additional ones, which are screwed to the same base.
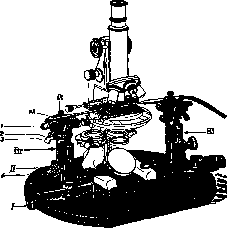
Figure 1.
The Chambers micromanipulator differs from the previous one primarily in that the instruments are located in front of the microscope stage: both instruments are brought to the object from one side. There are 2 types of the Chambers micromanipulator: in one the indicated mechanical device for moving the microinstrument is attached to the microscope stage, in the other it is fixed to a massive base on which the microscope is also placed. More practical (according to Chambers) is to screw the left device to the microscope stage, and the right one (with a column) to fix to the base. Both microinstruments should then be located close to each other. To the Chambers micromanipulator is adapted a convenient micropipette, functioning by means of a special Luer-type syringe. In a new modification of the Chambers micromanipulator, adapted for determining pH and H inside the cell (Needham), both mechanical devices (for 2 instruments) are located one above the other at the side of the microscope stage and fixed on one column. The Taylor micromanipulator is as it were a simplified model of the Peterfi micromanipulator: on a massive base (which provides the necessary stability)
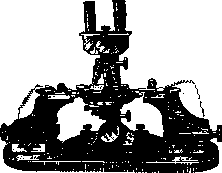
FIG. 2.
in the center is placed a microscope (fig. 2), on the sides-2 operating stands (2 micromanipulators according to Taylor's terminology); 3 basic movements of microinstruments, which are attached to the top of the operating stands, are provided by screws with fine threads; the stand has a circular base, so that it can be rotated around a vertical axis.-All 3 mentioned micromanipulators satisfy the main requirement-to be able to perform with confidence the finest movements of microinstruments under the control of the microscope at any magnification. These micromanipulators have proven to be quite suitable for a wide variety of microoperations. Along with their advantages, each of them also has certain disadvantages. Peterfi's micromanipulator is the most universal; it allows for more extensive movements of instruments through ordinary and micrometer screws. - Chamber's micromanipulator is less bulky, but with fewer possibilities for moving microinstruments; it differs by a simpler, more convenient device for microinjections (see below micropipette) compared to Peterfi's micromanipulator. Taylor's micromanipulator has somewhat fewer possibilities, but deserves attention due to the simplicity of its construction. If high magnifications are not required, in many cases instead of large microscope models it is convenient to use, for example, a Zeiss bin dissecting microscope. The latter combination proves especially valuable in cases where one wants to examine, for example, some organ in situ, without removing it from the animal's body, and to perform under these conditions some kind of effect with the help of microinstruments (see separate table, fig. 9). In some cases, special micromanipulators can be replaced by simpler mechanical devices and various improvisations. One can, for example, attach a micropipette to the upper ring (holder) of a dissecting magnifier, firmly secure the base of the magnifier on the table, and use the rack and pinion screw of the magnifier to move the micropipette up and down, and with the help of the screws of the movable microscope stage, give the object sideways movement and in other necessary directions. With some skill, it is possible to perform certain microoperations on cells without a micromanipulator, holding the microinstruments directly by hand. In any case, microoperations at a magnification of 300 times or more require the use of a micromanipulator (Peterfi). 2. Microinstruments and their manufacture. In M. almost exclusively glass microinstruments are used, since metal instruments (platinum, copper, steel), not to mention the difficulty of their preparation, at the required thinness of the tip (not thicker than 1-2 mm) are no stronger than glass ones. The center of gravity of microsurgical technique lies first of all in the manufacture of good glass microinstruments suitable for the planned micromanipulations. For the most varied microoperations, in most cases two kinds of instruments are used: micro needles and micropipettes. All these microinstruments are made with the help of a microburner (Mikrobrenner) (fig. 3); such a burner (gas or acetylene) should give a very small flame tip

Figure 3. Microburner (left) and lamp resistance with switch for electrical microinstruments.
1-2 mm high, very narrow, sharp at the top; to obtain such a flame, a thin needle from a syringe is placed on the thin tube of the microburner or a glass microburner is improvised. For making microinstruments, the following types of glass (in the form of tubes; for micropipettes, glass in the form of sticks can also be used) are used: a) refractory Jena glass (Jenaer Hartglas, Thermometerglas) or Pyrex glass, quartz (oxygenated flame is required)-for making especially thin tips; b) so-called Thuringian normal glass (Thüringer Normalglas) is most often used for the most diverse instruments; c) ordinary glass in tubes-for making coarser pipettes (Peterfi). For micro needles, glass tubes with an external diameter of 6-7 mm and wall thickness of 2-3 mm are purchased, for micropipettes-thin-walled tubes with a cross-section of 1-11/2 cm and wall thickness of 1-11/2 mm (no more). Micro needles are mostly prepared according to the following general scheme. First, from a section of tube (fig. 4, /) according to general rules (softening the middle
a,
Ж
ag
~
gk^mm IV-.....-fl-5------^=-----^----------Г c O v--fl-5----> mc - j- mc -ce a yr..........______________Гъм^1 mc- Figure 4. Diagram of making a micro needle and a micropipette. part of it on an ordinary flame and stretching the ends sideways) a straight (with a diameter of approximately 4 mm), sufficiently long capillary is made; from this capillary, with the help of the so-called "diamond pencil" (Schreibdiamant), the unnecessary side parts a,io(, are cut off, while the middle capillary, about 15 cm long (fig. 4, III), is held over a very small microflame, carefully heated at one point (c) and drawn outside the flame into a very thin, barely visible to the naked eye microcapillary (fig. 4, /V). After this, holding the capillary with the even thinner part mc sufficiently high above the microflame and very carefully bringing it close to the latter, the capillary is smoothly stretched by the ends c1 and c2 sideways: 2 micro needles are obtained (fig. 4, V). The quality of the tip is checked under the microscope: if the capillary was overheated, a non-durable micro needle is obtained, but a glass thread that oscillates even from a breath. Then the micro needle is heated not far from the tip (as shown by the arrow in fig. 4, V) and bent upwards at a right angle (or at an angle of 70-80°) with the help of an ordinary dissecting needle; the height of the vertical part is such that it can be easily manipulated in the operating chamber: depending on the height of the chamber-approximately 1-5 mm. The finished glass micro needle (fig. 4, V/) is inserted into the metal handle d, supplied with the micromanipulator. Micropipettes are prepared in a similar way; a thin-walled tube is taken, and when the middle of the microcapillary (fig. 4, IV) is heated, the stretching sideways is not done so smoothly, but with a jerk-the microcapillary breaks, 2 micropipettes are obtained (as in V); they are checked under the microscope to see if micropipettes or needles were obtained. The tip of the micropipette is also bent upwards.-Some other manufacturing methods are also used. A more reliable way to prepare the finest tip of a micro needle is with a microcauter in the field of view of the microscope. A microcauter is a glass tube into which a thin platinum wire in the form of an arc is sealed, with a
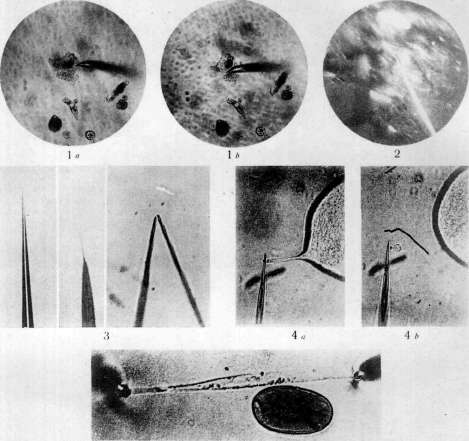
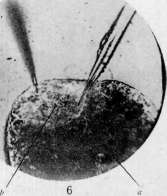
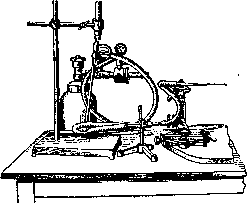
Figure 1. Cutting a cell in tissue culture: a-approaching the cell with a micro needle; b moment of cutting the cell with a micro needle. Figure 2. Ultramicroscopic surgery: investigation with the help of a microneedle on colloidal particles of vanadium pentoxide (according to Peterfi). Figure 1. Tips of various glass micro needles. Figure 4. a pulling of the micro needle around a cell (from Chambers' experiments with echinoderm eggs); b the detached part of the cytoplasm rounded into droplets. Figure 1. Stretching of an erythrocyte by two micro needles (according to Seifriz). Figure (>. Injection of indicator (Prussian-blue) into a cell with a micropipette and damage to the stained cell with a micro needle; the damaged area instead of bluish (a) acquired a yellow tint (>), corresponding to pH 5.4-5.6. Figure 7. Microloop with a single bacterium; on the left a drop with bacteria. .g. Microsurgery. Figure 8. Peterfi's micromanipulator with auxiliary equipment: a-micromanipulator with microscope, on the microscope stage-Peterfi's operating chamber; b-distribution board with regulator for the operating chamber, switch, etc.; c-lamp resistance and switch for microcauter, electrical micropipette, etc.; d-set of glass microinstruments, kept in test tubes. Figure 9. Microoperations with incident light: a-operating table with an animal fixed on it; b-binocular dissecting microscope with a lamp attached to it; c-operating stand of the micromanipulator with microinstrument. platinum tip (fig. 5). The microcauter is fixed on one operating stand of the micromanipulator, on the other an ordinary micro needle, pulled by hand, is placed. Current from a battery (2-4 V, 1--11/» A) or from the city lighting network (introducing a lamp resistance with a movable rheostat; fig. 3) is turned on; the glass tip of the micro needle is brought to the heated platinum appendage or directly to the arc (depending on the beginning) in such a way,
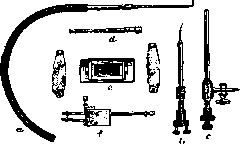
Figure -5. Set of instruments for microsurgery: a-micropipette (for mouth); 5-microcauter; c-electrical pipette by Peterfi; d-metal handle for micro needle; e-Peterfi's operating chamber; /-microforceps according to Peterfi.
so that, when melted, it adheres to a platinum wire, and the required tip is drawn out. By means of a micromanipulator, the needle, by bending its tip, can be transformed into a micropipette for microbiological work. Micro-needles come in different types: wider and stronger ones (see separate table, fig. 3), or with a very sharp, thin, short spine at the end, or with slightly rounded, blunted ends [such needles, inserted into a corresponding metal device (fig. 5, f), serve as micro-forceps], or they may be curved like a bayonet, adapted for cutting. Two types of micropipettes are distinguished: micropipettes with a rubber tube and mouthpiece (mouthpiece pipettes, Mundpipette according to Peterfi terminology), the diameter of whose outlet opening is greater than 25 μ (fig. 5), and thinner pipettes ("cell pipettes", Zellpipette) for introduction into cells etc. with an opening less than 25 μ. For introduction into a cell, micropipettes with an outlet width of 8-15 μ (Peterfi) or even 1-11/2 μ (Chambers) (fig. 6) are most often used. With such a thin A
opening, considerable pressure is required to force liquid through it; for this, special devices are necessary. In Barber's original micropipette, the required pressure was achieved rather primitively by heating or cooling a column of mercury located in the sealed end of the pipette. In Chambers' micropipette, the required pressure or suction is created by means of a carefully selected glass syringe (Luer type), which is connected to the glass micropipette by a long, flexible metal tube (fig. 6. Tips of Chambers' micropipettes: A - sealed; B - broken under microscope control; C - pipette drawn out and broken in the usual way). The latter is hermetically attached to the tube. In Taylor's micropipette, pressure is created on a rubber gasket and on mercury by rotating screws; the latter pushes in or draws in the required amount of liquid through the thin tip of the micropipette. In Peterfi's electric pipette (fig. 7), an electric current (1-5 μA; if from the city network, a lamp resistance is necessary) (see separate table, fig. 8) heats a thin platinum wire and heats the air inside the pipette, which in turn pushes out the contents of the micropipette; by using the side fan of the pipette, faster and slower injections can also be made. The thin glass micropipette is hermetically attached to the thicker part of the electric pipette with paraffin or special glue (a mixture of rosin with wax).-For preserving micro-needles and micropipettes, ordinary test tubes are used, for which the instrument is fixed in a stopper that seals the test tube in such a way that the micro-instrument is inside the test tube, not touching its edges or bottom (see separate table, fig. 8). In cases where the pressure developed by the electric pipette is insufficient, Peterfi suggests using so-called high-pressure pipettes and vacuum pipettes (Hochdruck - Vakuumpipette), shown in fig. In addition to micro-needles and micropipettes, with which the greater
part of the most diverse operations is performed, sometimes certain special instruments are also required. For experiments on cell irritation, for electrometric measurements etc., microelectrodes are used. In addition to ordinary metal electrodes, in which a platinum or Wolaston wire is passed inside a glass tube, with the thin tip protruding outward, non-polarizable electrodes are also used. To prepare a microelectrode according to the method of Ettysh and Peterfi, the micropipette (glass capillary) is filled with agar with potassium chloride (2% agar in nll0 KCl)-this is the tip of the electrode. Its other end is attached to a T-shaped microcalomel electrode. In biological experiments where K could have a harmful effect, KCl can be replaced by Ringer's solution (Peterfi). Microelectrodes of other designs have also been proposed (Taylor, Whitaker and others). Chakhotin has designed a special device for localized damage to a cell by means of a thin beam of ultraviolet rays. Sometimes other types of instruments are also made: to a glass needle, a drop of Canada balsam is attached to attach a butterfly scale and obtain a miniature spatula, or if a scale is attached edge-on, a small knife etc. For these purposes, the most diverse objects of plant and animal origin can be used. b. m. a. t. xviii. and S28 3. Operating (wet) chambers. In order to be able to examine the object for micromanipulation at high magnification and at the same time have it accessible from below to the action of micro-instruments, special operating chambers are used,
Fig. 8. Vacuum pipette and high-pressure pipette.
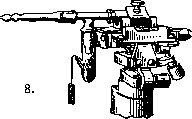
in which the object is protected from drying out by maintaining humidity («feuchte Kammer»). The glass chambers of Barber, Chambers, etc., are constructed so that one side is open for the introduction of instruments, and a coverslip is placed on top with the object facing downward. The most common chamber is that of Peterfi (fig. 5), consisting of a metal frame (1 cm in height, 3 cm in width, and 9 cm in length), the right and left sides of which open for the introduction of instruments; at the bottom of the chamber is a glass plate; along the long sides are grooves into which, during work, strips of thoroughly moistened cotton or filter paper are placed to maintain humidity. A coverslip is placed on top with the object facing downward. To achieve complete sealing of the chamber when microinstruments are inserted, Peterfi proposed using thin rubber cuffs, one side of which is attached to the chamber, while the other tightly grips the thicker part of the instrument; however, this proved to be unnecessary and impractical, and Peterfi no longer uses them in recent times. In cases where it is necessary to perform microsurgery and observe the changes it causes at body temperature, special heated operating chambers are used (a heating stage is less suitable). The heated humid (universal) Peterfi chamber consists of 2 parts, one of which is the actual operating chamber (its height can vary from 41/2 mm to 10 mm), while the other contains a device for heating and regulating temperature (a bimetallic regulator). For heating, the city lighting circuit is used: on a separate board (see separate plate, fig. 8) is placed a switch-lamp resistance, and the thin regulating mechanism is powered by current from a separate small battery (like that for an electric bell; the battery and relay are on the same board), so that 4 wires go to the chamber: 2 for heating, 2 for regulation. The coverslips closing the chamber from above most often have a size of 25 x 52 mm. Optical conditions. When working with small or medium magnifications, any light source can be used. For microsurgery with high magnifications and for microphotography, intense light sources should be used whenever possible—100-watt «Osram-Nitralampe» lamps, arc lamps (used for microphotography), Punkt-lichtlampe (the latter are excellent in themselves but are very demanding and often stop functioning completely when current is improperly supplied). If the object is very sensitive to thermal effects, heat-absorbing baths are placed between the microscope and the light source. Since during microsurgery the object is not in the plane of the microscope stage but significantly higher, special condensers must be used to create suitable lighting conditions. For this reason and to obtain good dark-field illumination, special condensors are necessary, for example the Praeparat-Wechselkondensor of Peterfi (see Microscope). General techniques for performing microsurgery. The object intended for various microsurgical procedures and different effects is most often placed on a thoroughly cleaned (!) coverslip in the manner of a «hanging drop» in some physiological solution (Ringer-Locke, Tyrode, etc.), serum, blood plasma, etc. Tissue cultures (see Tissue cultures), which make it possible to perform microsurgery on cells under the most so-called physiological conditions (Peterfi, Krontovsky), are prepared for microsurgical purposes on coverslips (not on mica!) in a very thin layer of plasma (Peterfi) or even in a thin layer of liquid media (Krontovsky). To prevent cells in a normal «hanging drop» from floating but to keep them in place by capillarity, in most cases it is sufficient to aspirate the excess liquid with a micropipette (with a mouthpiece). Sometimes it is advisable to first apply a thin layer of 1-2% gelatin or agar solution to the coverslip. In some cases, if this is insufficient, larger objects are held in place by a micro-needle or micro-forceps—two micro-needles with blunted ends [see separate plate (p. 319-320), fig. 3], inserted into a metal device (fig. 5), which by rotating a screw allows the ends of the needles to be brought closer together or moved apart from each other. The object can also be held with a micro-spreader. If the objects are too small (diameter less than 20-25 μ), the following device can be used (Mikrowasserleitung, according to Peterfi): a drop of physiological solution is placed on a coverslip and a small piece of so-called Japanese silk paper (or thin filter paper, cotton) is put into it; a drop of the desired cell suspension is placed on this paper, and the piece of paper together with the material is torn apart with dissecting needles. Thin films of liquid form between the fibers, in which individual cells suitable for microsurgery are sought. The general scheme for performing microsurgery is as follows: the operating chamber (without coverslip and object) is secured on the microscope stage. The prepared and checked microinstrument is fixed with a clamp on the operating stand (wrapping the holder with Japanese paper or cotton). The end of the microinstrument is brought into the field of view of the microscope (at low magnification) using coarse screws and positioned exactly in the center (check at high magnification!). Then the microinstrument is lowered straight down (without touching the screws for other movements, so as not to disrupt centering and not to move the instrument out of the field of view) almost to the bottom of the operating chamber. After this, without moving either the chamber or the instrument, the coverslip with the object is secured with vaseline (if necessary—with glue or strips of adhesive tape, e.g., when working with an immersion system) on the operating chamber (object facing downward). The desired object (a cell) is positioned (using the screws of the movable microscope stage) in the center of the field of view. Then the previously centered instrument (at low magnification) is carefully raised upward until its shadow appears in the field of view; then the instrument is slightly moved aside so that when it is raised further it cannot damage the given cell but is located near it; then the final positioning of the tip of the instrument and the object in the field of view is performed. Finally, they are arranged so that the desired effect can be produced [see separate plate (p. 319-320), fig. 1]. If, for example, it is necessary to cut a cell or cut off a part of it, this can be achieved in three ways (according to Peterfi): 1) to pierce the tip of a micro-needle and by further movement of the needle separate the desired part through the protoplasm; 2) to cut by simple pressure, by passing a very thin, strong needle tip (see separate plate, fig. 1); 3) to slowly divide, to ligate the cell with the help of a flexible needle tip (Taylor), in some cases hook-shaped (Peterfi) (fig. 9). With the help of micro-needles, many other operations are also performed: removal of the nucleus from a cell (the nuclear substance, since it is liquid, can also be removed with a micropipette), introduction of a grain of indicator or some other substance into the cell [see separate plate (p. 319-320), fig. 6], etc. Photographing microsurgery. For objective recording of the course of microsurgery and the changes occurring in the object (cell, its nucleus, etc.) at that time, it is very important to be able to instantly photograph any moment without interrupting work. Sketching and photographing with ordinary microphotographic equipment can give very little in this regard. Therefore, all those modern
w
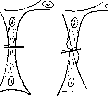
Figure 9. Cross-section at the junction of two cells in a tissue culture (according to Olive). size: in fig. 4 smaller apparatus for microphotography, which allow one to look into the microscope and at the same time take instantaneous photographs in the form of photographs of individual moments, series of photographs (Serienaufnahmen) or microcinematographic recordings.-Of the various systems of the first type, the Zeiss photographic eyepiece 'Phoku' (and similar apparatus of other firms) deserves special attention. This small camera (472×6) is mounted on top of the microscope tube in place of the eyepiece; part of the rays is deflected by a prism into a side tube facing the researcher; during the entire microoperation, the microsurgeon looks into this tube (eyepiece), pressing the shutter release at the necessary moment. The resulting microphotograph in the form of a circle has only about 3.5 cm in diameter, but due to the high quality of Zeiss optics, it can be enlarged many times. In fig. 1 and 4 (separate plate, p. 319-320) - two microphotographs obtained in this way are shown; a cell (in tissue culture) with dark, granular protoplasm, with several nuclei (light spots) is photographed; near the cell the tip of the microneedle being brought to the cell is visible; in fig. 1 the moment of cutting the cell, separating a part of the cytoplasm with one nucleus is photographed.-Recently the Leitz firm (in Wetzlar) has released a new small camera (similar to 'Phoku') for motion picture film ('Mifilmca'). This apparatus allows one to make a series of 36 photographs (format 24x36 mm) in a short time (without changing the cassette), which is especially valuable in M.-For microcinematography of microoperations, both movie cameras that can be placed on top of the microscope (in which case a side eyepiece, e.g., of the Phoku or Einblickokular Scheminzk'oro type, must be inserted between the movie camera and the microscope, and minor changes made in the arrangement, setup of the auxiliary parts of the micromanipulator) and cameras of the Zeiss 'Kinamo' type with microphoto attachments, which are attached to the side of the microscope (fig. 2 in cinematography) can be used; it is only necessary to modify the stand somewhat; sometimes remove one operating stand (without which most microoperations can do) and so on. Recently T. Peterfy has prepared an excellent film demonstrating microsurgical methods and techniques as well as the basic, typical microoperations. This film, entitled 'Das mikrurgische Verfahren', has been put on sale in Berlin by a special scientific film studio (Verlag: Wissenschaft-lichen Filme); the same publisher has also released a film by A. Fischer on the technique of tissue cultures. Microoperations with incident light. The modern development of the technique and methods of microscopic research with incident light makes it possible at present to apply microoperations and various effects to opaque objects, even to tissues and organs left in situ in the animal body, e.g.: to study how irritation with a microneedle affects the vessels of the mesentery, to investigate circulation in the kidney glomeruli, to determine the reaction of tumor vessels to the local application of adrenaline. In such cases, microinstruments are not brought from below, as is usual in M., but from above [see separate plate (p. 319-320), fig. 9]. The small distance between the objective and the object makes work difficult; nevertheless, with some experience, it is possible to work with dry systems giving magnification up to 900 times (Vonwiller). It is convenient to combine the micromanipulator with a dissecting microscope (fig. 9 on separate plate) and to use, if possible, ordinary daylight or a bulb adapted to the microscope (as for capillaroscopy), or else to use vertical illuminators, for example Spalt-opakilluminator with a simple or slit lamp of Gullstrand according to the technique of Vonwiller. For the convenience of such research, the Leitz firm has released a table that moves by means of screws, on which one can secure, for example, an immobilized rabbit, a plant in a pot with earth, etc. In a similar way, Vonwiller in experiments with the insectivorous plant Pinguicula extracted with a microtool or micropipette a droplet of secretion from individual glands and subjected it to various investigations.-The operating stand ('assistant') of the micromanipulator together with its base (if necessary, the right stand is screwed on the left) or secured on another stand can also be placed at the patient's bedside, e.g., for catching from the blood of the patient, released right there in a Petri dish, individual specimens of filariae, etc. Ultramicroscopic microsurgery. When working with dark-field illumination at low or medium magnifications (using Peterfy's Praeparier-Kondensor'oB) no special difficulties arise (Peterfy and Wamoscher). If, however, stronger systems with higher apertures are required for a given work, one has to use a special 'ultramicroscopic M.', developed by Peterfy and Szegvari. The main feature of this technique is that microeffects are produced in the plane of the microscope stage and paraboloid- or cardioid-condensers of high apertures are used (see Microscope). To carry out ultramicroscopic manipulations with colloidal structures, Peterfy uses as a slide a thin glass plate with a strip prepared from a coverslip glued onto it (fig. 10): their total height for cardioid-condensers should be 1.05 mm, and for paraboloid-condensors 1-2 mm. Microinstruments are made from as thin a capillary as possible (1-12/2 mm), with its end part having a thickness of only 0.05-0.1 mm. When the thin tip of such a microtool or pipette is directed to the glued strip, a droplet of the colloidal solution under investigation is placed on it and, with the aid of an apparatus (fig. 10, right), secured on another operating stand, the strip prepared from a coverslip is lowered in such a way that a thin layer of the colloidal solution is between strictly parallel horizontal planes. In this way Peterfy and Szegvari in old iron oxide sols, in soaps, etc., investigated the extensibility of ultramicroscopic threads, in vanadium pentoxide sols-rotation of rod-shaped ultraparticles [see separate plate (p. 319-320), fig. 2], etc. In a similar way, protoplasmic formations, myxomycetes, etc. can be studied in detail at high magnifications (Zeiss, special objective X or Y) (Peterfy). Examples of the application of microsurgical technique in different fields of biology and medicine. The development of microsurgical technique and methods has created new possibilities and already now, despite the recent emergence of this experimental field, microsurgical methods have found fruitful application in the most diverse fields of biology and medicine. a) Study of the physical properties of protoplasm and individual parts of the cell. The possibility of investigating the living cell by means of microinstruments has especially strongly contributed to the development of modern.
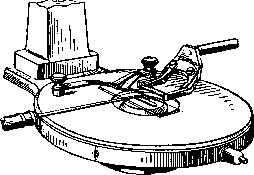
Figure 10. Apparatus for ultramicroscopic microsurgery (according to Peterfy).
knowledge of the basic properties of living protoplasm and the individual parts of the cell. Data obtained in this way formed the basis of modern cytology and protoplasm research (Protoplasmaforschung), which has recently acquired particularly important significance, since the study of the nature of living protoplasm forms the basis of all knowledge of the dynamics of life phenomena (Seifriz). Even a simple touch, prick, or pulling of the cell protoplasm with a micro-needle allows one to determine the aggregate state, consistency, and viscosity of the protoplasm, etc. In Fig. 4a (separate table, pp. 319-320) it is seen how a thread (strand) of protoplasm stretches behind the tip of the needle, which, after the break of the stretched strand, collects into droplets like a liquid (Fig. 4b). Microsurgical technique made it possible to develop a new method for determining the viscosity (see) of protoplasm: Heilbronn, then Freundlich and Seifriz, and others introduced the smallest particles of iron or nickel into the cell, into the protoplasm of eggs of echinoderms, into the plasmodium of myxomycetes, etc., using a micro-needle, and, attracting them with an electromagnet, caused them to move: comparing the strength of the current needed for a certain movement (measured with an ocular micrometer) of the particles in the protoplasm and, for example, in water, makes it possible to judge the viscosity of the protoplasm. By studying how metal particles, introduced into the protoplasm and moved with an electromagnet, return to their original position when the current is turned off, it was possible to obtain data on the elasticity of protoplasm. A similar technique was developed by Freundlich and Seifriz for measuring the elasticity of colloidal solutions. The elasticity of protoplasm is particularly demonstrably detected by the following method: the tips of 2 micro-needles are immersed in an amoeba, an erythrocyte, an isolated amphibian erythrocyte nucleus, etc. [see separate table (pp. 319-320), Fig. 5] and then the object is stretched with the needles; if the needles are released, the object contracts (Fig. 11) almost to its original size (Seifritz). In a living cell, protoplasm has considerable elasticity; with death, the elasticity almost completely disappears (Seifritz). Thus, a difference in physical and physiological properties has been established between the inner, more liquid part of the cell and the surface, denser layer of cytoplasm, which in some cells forms not only the usual surface protoplasmic film (membrane - see Cytology) but also a morphological shell - the pellicle, which can be separated with a micro-needle. The surface protoplasmic layer (protoplasmic shell, membrane), damaged or removed in any place with a micro-needle, quickly restores itself and isolates the exposed protoplasm from the surrounding environment or the damaged part from the healthy protoplasm (Fig. 9). Physiologically important is the circumstance that this membrane is capable of changing its consistency, like the endoplasm (Chambers, Seifritz, and others). Various intracellular structures have been studied using microsurgical technique: the cell nucleus, its contents and membrane, the chromosomes of a dividing cell, the nuclear spindle (achromatic apparatus - see Karyokinesis), mitochondria, cilia, flagella, undulating membranes, etc. Although the study of the physical state of the living cell nucleus is associated with great difficulties due to the extreme ease with which nuclear substance turns into a relatively dense gelatinous mass, with very careful introduction of micro-instruments into the nucleus (so that coagulation does not occur), it is still possible to ascertain that the nucleus of all studied cells (in interkinesis) in Metazoa has a liquid content in which the nucleolus can be easily moved (Chambers and his collaborators). With the slightest damage to the nucleus (even when observed in Ringer's solution, lymph, serum, etc.), a reticular or granular structure easily appears in it due to coagulation, similar to the picture of a fixed nucleus (Chambers). A prick of the nucleus of a spermatocyte preparing for division induces, accelerates the formation of chromosomes. During mitotic division, it is possible to isolate chromosomes (see vol. XIII, p. 69, Fig. 27) and

examine their physical properties. The spindle (achromatic apparatus) turns out to be a homogeneous (not fibrous), denser formation than the surrounding liquid protoplasm; it can be moved inside the cell or extracted from the cell along with the chromosomes (Figs. 12 and 13). This fact formed the basis of modern concepts of the mechanism of mitosis (Belaf, Wassermann). For other interesting data, see special monographs and manuals.
b) Study of cell reactions to various influences. With the help of microsurgical technique, valuable data on the physiology of protoplasm and cells have been obtained. Peterfi and his collaborators, studying the reaction of various normal cells and cells of carcinomas and sarcomas to mechanical irritation and damage (pricking with a needle), established a number of regularities: in different cells, as in amoebas in Chambers' experiments, more or less pronounced liquefaction of the cytoplasm was observed at the site of the prick (the phenomenon of 'thixotropy' - the transformation of a gel into a sol and back, observed in colloids); this reaction to mechanical irritation is expressed differently in cells of different types (probably corresponding to the different colloid-chemical structure of their protoplasm): for example, in myoblasts (from embryonic heart), small blood monocytes, in cancer cells (in contrast to sarcoma cells), rapid and significant liquefaction of the protoplasm follows the prick; in other cells this phenomenon is less pronounced; for large monocytes and macrophages, a significant increase in the cell after exposure to the needle is particularly characteristic (Peterfi); in neuroblasts in tissue cultures, the vital stainability changes with mechanical irritation. After pricking the nucleus (Fig. 14), the cytoplasm surrounding the nucleus quickly undergoes disintegration and liquefies (Chambers, Peterfi), possibly due to the harmful effect on the cytoplasm of the nucleic acid coming out of the nucleus (Peterfi). With the help of a micropipette, it is possible to extract the liquid contents of the nucleus and the cytoplasm of another cell; the latter quickly disintegrates in this case (Chambers). Interesting data were obtained by Levi in experiments with mechanical damage to nerve fibers (Figs. 15 and 16) growing in tissue cultures: protoplasmic expansions appear at the site of mechanical irritation; if the fiber is cut, the peripheral part of the fiber, separated from the nerve cell, Fig. 13. Destruction of the achromatic figure with a micro-needle and its restoration.
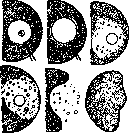
Fig. 14. Pricking the nucleus. inject it into
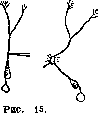
Damage-
usually dies; however, if the part of the fiber adjacent to the cell, after the cut, connects with the peripheral segment before it finally dies (Fig. 16), the nerve fiber is restored and continues to grow. The microsurgical technique opened up a new possibility, very important physiologically: the possibility of a comparative study of the effect of various substances introduced directly into the cell, compared with the effect of the same substances from the outside. With respect to electrolytes, it was possible to shed light on the 1 introduction of micro-needles for the study of the regeneration of nerve fibers in tissue cultures: do they develop their own (according to Levi).
action only from the surface of the cell or from within: K and Na, as it turned out, act equally from within and without (liquefaction of the protoplasm, swelling, etc.); when Ca and Mg act from without, no sharp changes are observed inside the cell, but upon injection into the cell, severe damage to the protoplasm, coagulation, etc., occur. Aqueous solutions of various substances that do not penetrate the cell from without freely diffuse throughout the inner part of the cytoplasm when directly introduced into it (Chambers). c) Determination of pH and rH inside the cell. The development of microsurgical techniques made it possible to determine the true reaction inside the cell, to determine the hydrogen number pH (see Hydrogen ions) by means of colorimetric (see Indicator method) and electrometric methods. Chambers and Pollack by means of a micropipette injected aqueous solutions of indicators into the protoplasm or nucleus of the cell (of the eggs of echinoderms) and directly compared the resulting color with the color of glass capillary tubes filled with indicators, or with images of colored standard tubes thrown into the field of view of the microscope by Pantin's method. In this way it was established that the pH of normal cytoplasm = 6.7 ± 0.1 (according to Needham, pH = 6.6), while the pH of sea water = 8.2-8.4. The nucleus proved to be more alkaline than the cytoplasm: pH = 7.5 ± 0.1. If a cell into which an indicator has been injected is damaged with a micro-needle [see separate table (pp. 319-320), Fig. 6], the damaged area acquires a more acidic reaction-down to pH = 5.6 and lower. Schmidtman, by introducing the finest grains of indicators into cells of various tissues and organs with a needle of a micromanipulator, determined the pH of cells of various organs: pH of the epithelium of the renal tubules-6.7-7.2; of the liver-6.7-7.5; of the pancreas-7.2-7.5; of the capillary endothelium-6.3-6.4, etc. During cloudy swelling of the cells, the protoplasm acquires a more acidic reaction. When feeding with acids or alkalis, a change in pH was observed in the organs involved in the reception and excretion of the introduced substances (Schmidtman). Potentiometric measurements were also made by means of non-polarizing microelectrodes introduced into the cell; the pH of the sap of Nitella cell was found to be about 6.16; data regarding the protoplasm are still insufficient. With the help of microsurgical techniques, it has also become possible to study one of the most important problems of intracellular activity-to determine the oxidation-reduction potential of the protoplasm, characterized by the magnitude of rH. By microinjecting into the cell a system of indicators, J. and D. Needham determined inside the amoeba (Amoeba proteus) pH = 7.6, rH = 17-19 (i.e., the cell has a slightly alkaline reaction and a small shift in the reducing direction from the point of oxidation-reduction neutrality); inside the eggs of sea urchins and starfish, tunicates pH = 6.6 (during cytolysis it decreased to 5.0 and 4.0), while rH varies between 19 and 22 (i.e., the reducing capacity is less than that of the amoeba). In the cells of the salivary glands of insect larvae, Rapkine and Wurmser found pH = 7.2, rH = 19.0-20.4; in the cells of Spirogyra rH = 14-16; rH can vary considerably under different conditions. d) Isolation of a single bacterium. Modern microsurgical technique is also the most reliable way to isolate and separate a single bacterial individual from a mass of bacteria. With its help, it is possible not only to isolate any one bacterium, which was already achieved by the founders of microsurgery Schouten (1903) and Barber (1904), but also to select a specific bacterium and isolate it precisely in order to obtain a colony from it, to inoculate an animal with it, etc. Such work is now carried out with full confidence, with reliable control of all manipulations under the microscope, even when dealing with very small microbes, e.g., with one specific, predetermined pneumococcus: in such cases, the microsurgical technique of work with dark-field illumination is especially valuable. Bacteria can be isolated by means of a micro-needle, a micropipette, or a microloop. Fig. 17 shows the phases of isolating a bacterium from a small drop of material containing bacteria by means of a glass micro-needle bent in the form of a bacteriological loop; in the photograph [see separate table (pp. 319-320), Fig. 7] a loop with a film of captured liquid is shown; in the center-one single bacterium. Peterfi uses a micropipette (made from a thin-walled capillary with a diameter of 1 mm) with an opening of 3-5 μ for isolating bacteria. A drop of material containing bacteria (from a culture, from the blood of an infected animal, etc.) is placed on a coverslip, next to it a drop of physiological solution or nutrient medium. From the very edge of the first drop, where the bacteria lie in a single layer, one bacterium is drawn into the pipette and transferred to the second drop. For inoculating an animal, the micropipette with the isolated bacterium can be removed from the micromanipulator and its tip introduced under the skin (or into the peritoneum) through a previously prepared incision. In this way, it was possible to infect animals with truly a single bacterium. With the help of a micropipette, it is also possible to infect tissue cultures with Trichomonas, to implant one isolated sarcoma cell into a culture of fibroblasts, monocytes, etc.
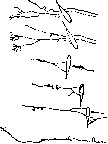
Figure 16. Regeneration of a cut hydra as pH = 8.2-8.4. The nucleus proved to be more alkaline than the cytoplasm: pH = 7.5 ± 0.1. If a cell into which an indicator has been injected is damaged with a micro-needle [see separate table (pp. 319-320), Fig. 6], the damaged area acquires a more acidic reaction-down to pH = 5.6 and lower. Schmidtman, by introducing the finest grains of indicators into cells of various tissues and organs with a needle of a micromanipulator, determined the pH of cells of various organs: pH of the epithelium of the renal tubules-6.7-7.2; of the liver-6.7-7.5; of the pancreas-7.2-7.5; of the capillary endothelium-6.3-6.4, etc. During cloudy swelling of the cells, the protoplasm acquires a more acidic reaction. When feeding with acids or alkalis, a change in pH was observed in the organs involved in the reception and excretion of the introduced substances (Schmidtman). Potentiometric measurements were also made by means of non-polarizing microelectrodes introduced into the cell; the pH of the sap of Nitella cell was found to be about 6.16; data regarding the protoplasm are still insufficient. With the help of microsurgical techniques, it has also become possible to study one of the most important problems of intracellular activity-to determine the oxidation-reduction potential of the protoplasm, characterized by the magnitude of rH. By microinjecting into the cell a system of indicators, J. and D. Needham determined inside the amoeba (Amoeba proteus) pH = 7.6, rH = 17-19 (i.e., the cell has a slightly alkaline reaction and a small shift in the reducing direction from the point of oxidation-reduction neutrality); inside the eggs of sea urchins and starfish, tunicates pH = 6.6 (during cytolysis it decreased to 5.0 and 4.0), while rH varies between 19 and 22 (i.e., the reducing capacity is less than that of the amoeba). In the cells of the salivary glands of insect larvae, Rapkine and Wurmser found pH = 7.2, rH = 19.0-20.4; in the cells of Spirogyra rH = 14-16; rH can vary considerably under different conditions. d) Isolation of a single bacterium. Modern microsurgical technique is also the most reliable way to isolate and separate a single bacterial individual from a mass of bacteria. With its help, it is possible not only to isolate any one bacterium, which was already achieved by the founders of microsurgery Schouten (1903) and Barber (1904), but also to select a specific bacterium and isolate it precisely in order to obtain a colony from it, to inoculate an animal with it, etc. Such work is now carried out with full confidence, with reliable control of all manipulations under the microscope, even when dealing with very small microbes, e.g., with one specific, predetermined pneumococcus: in such cases, the microsurgical technique of work with dark-field illumination is especially valuable. Bacteria can be isolated by means of a micro-needle, a micropipette, or a microloop. Fig. 17 shows the phases of isolating a bacterium from a small drop of material containing bacteria by means of a glass micro-needle bent in the form of a bacteriological loop; in the photograph [see separate table (pp. 319-320), Fig. 7] a loop with a film of captured liquid is shown; in the center-one single bacterium. Peterfi uses a micropipette (made from a thin-walled capillary with a diameter of 1 mm) with an opening of 3-5 μ for isolating bacteria. A drop of material containing bacteria (from a culture, from the blood of an infected animal, etc.) is placed on a coverslip, next to it a drop of physiological solution or nutrient medium. From the very edge of the first drop, where the bacteria lie in a single layer, one bacterium is drawn into the pipette and transferred to the second drop. For inoculating an animal, the micropipette with the isolated bacterium can be removed from the micromanipulator and its tip introduced under the skin (or into the peritoneum) through a previously prepared incision. In this way, it was possible to infect animals with truly a single bacterium. With the help of a micropipette, it is also possible to infect tissue cultures with Trichomonas, to implant one isolated sarcoma cell into a culture of fibroblasts, monocytes, etc.
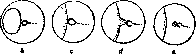
Figure 17. Diagram of isolating a single bacterium: a-cover glass with several drops containing bacteria; b-a separate drop and the tip of a micropipette; c-e (at higher magnification) stretching of a small drop with a micropipette loop containing one bacterium (from Küster).
Potentiometric measurements were also made by means of non-polarizing microelectrodes introduced into the cell; the pH of the sap of Nitella cell was found to be about 6.16; data regarding the protoplasm are still insufficient. With the help of microsurgical techniques, it has also become possible to study one of the most important problems of intracellular activity-to determine the oxidation-reduction potential of the protoplasm, characterized by the magnitude of rH. By microinjecting into the cell a system of indicators, J. and D. Needham determined inside the amoeba (Amoeba proteus) pH = 7.6, rH = 17-19 (i.e., the cell has a slightly alkaline reaction and a small shift in the reducing direction from the point of oxidation-reduction neutrality); inside the eggs of sea urchins and starfish, tunicates pH = 6.6 (during cytolysis it decreased to 5.0 and 4.0), while rH varies between 19 and 22 (i.e., the reducing capacity is less than that of the amoeba). In the cells of the salivary glands of insect larvae, Rapkine and Wurmser found pH = 7.2, rH = 19.0-20.4; in the cells of Spirogyra rH = 14-16; rH can vary considerably under different conditions. d) Isolation of a single bacterium. Modern microsurgical technique is also the most reliable way to isolate and separate a single bacterial individual from a mass of bacteria. With its help, it is possible not only to isolate any one bacterium, which was already achieved by the founders of microsurgery Schouten (1903) and Barber (1904), but also to select a specific bacterium and isolate it precisely in order to obtain a colony from it, to inoculate an animal with it, etc. Such work is now carried out with full confidence, with reliable control of all manipulations under the microscope, even when dealing with very small microbes, e.g., with one specific, predetermined pneumococcus: in such cases, the microsurgical technique of work with dark-field illumination is especially valuable. Bacteria can be isolated by means of a micro-needle, a micropipette, or a microloop. Fig. 17 shows the phases of isolating a bacterium from a small drop of material containing bacteria by means of a glass micro-needle bent in the form of a bacteriological loop; in the photograph [see separate table (pp. 319-320), Fig. 7] a loop with a film of captured liquid is shown; in the center-one single bacterium. Peterfi uses a micropipette (made from a thin-walled capillary with a diameter of 1 mm) with an opening of 3-5 μ for isolating bacteria. A drop of material containing bacteria (from a culture, from the blood of an infected animal, etc.) is placed on a coverslip, next to it a drop of physiological solution or nutrient medium. From the very edge of the first drop, where the bacteria lie in a single layer, one bacterium is drawn into the pipette and transferred to the second drop. For inoculating an animal, the micropipette with the isolated bacterium can be removed from the micromanipulator and its tip introduced under the skin (or into the peritoneum) through a previously prepared incision. In this way, it was possible to infect animals with truly a single bacterium. With the help of a micropipette, it is also possible to infect tissue cultures with Trichomonas, to implant one isolated sarcoma cell into a culture of fibroblasts, monocytes, etc.
Related articles
Mentioned in
Cite this page
“MICROSURGERY.” Soviet Medical Encyclopedia. English translation of Bolshaya Meditsinskaya Entsiklopediya, 1st ed. (Moscow, 1928–1936), ed. N. A. Semashko. https://sovietmedicalencyclopedia.pages.dev/article/microsurgery/