Injuries
Historical document, translated for reference. It reflects medical knowledge of the 1920s–30s and is not medical advice.
Summary
This article provides a comprehensive overview of injuries from a forensic medical perspective, categorizing them by location and type of instrument, with detailed descriptions of blunt and sharp force injuries, their characteristics, and effects on the human body.
Encyclopedia article (1928–1936)
Injuries from a forensic medical perspective - mechanical violations of the integrity or function of tissues and organs. Injuries are distinguished by their location and by the nature of the instrument with which they were inflicted. By location, injuries to the head, chest, abdomen, etc. are distinguished. Depending on the instrument, injuries are distinguished as: those inflicted by blunt or blunt-edged instruments, injuries from cutting, chopping and piercing instruments, and gunshot injuries. Injuries from blunt and blunt-edged instruments constitute the main mass of bodily injuries. The instruments used in this case are extremely diverse (fists, feet, nails, teeth, stones, sticks, brass knuckles, etc.). The effect of blunt and blunt-edged instruments is also observed in injuries from being run over by various vehicles, building collapses, as well as from falls from height. When blunt and blunt-edged instruments act, there occurs more or less strong compression of body parts, combined with greater or lesser displacement of tissues. When blunt force acts on the body, the so-called contusion (contusio) very often results, which is characterized by two signs - abrasions and bruises. Abrasions (excoriationes) arise from the tangential action of the instrument, whereby the epithelial layer is scraped off and the skin is exposed. These injuries have no surgical significance or acquire it only in exceptional cases, for example when they are the site of infection entry. Abrasions are also important from a forensic medical point of view, indicating the point of application of force, which together with their shape and location often makes it possible to determine the nature of the violence itself (for example, half-moon shaped abrasions on the neck and near the respiratory openings in manual strangulation, abrasions around the genital organs in rape, abrasions from rope in hanging and strangulation). Abrasions are also important as signs of former struggle and resistance. Abrasions usually bleed little or not at all. During the first hours, they are covered with a layer of fibrinous exudate, which then dries, forming a yellow or brown crust that falls off after 5-8-10 days without scar formation. On a corpse, abrasions appear as yellow or brown, dense spots, difficult to cut with a knife due to postmortem drying. Since all areas of skin that were moist or lacking epidermis during life acquire this property of drying on a corpse, it is not always easy to determine the method of origin of such spots. If there is a bruise in addition to an abrasion, this usually indicates that the injury occurred during life. Bruises in injuries are formed mainly in the subcutaneous tissue and underlying soft tissues from sudden displacement of the skin, ruptures of blood vessels and subsequent leakage of blood into surrounding tissues. The size of a bruise depends on the force of impact, the nature of the instrument, as well as on the caliber and properties of the damaged vessels (capillaries, veins, arteries). In places with loose tissue (eyelids, scrotum, etc.), extensive hemorrhages occur. Where the skin is attached to underlying tissues with dense connective tissue (for example on fingers, palms), large bruises do not form. The shape of bruises is most often round. Sometimes it reflects the nature of the instrument (bruises in the form of stripes from blows with a stick, whip, belt). Bruises can move along fascias and muscle sheaths and thus, after some time, be found not at the place where they formed. In forensic medical practice, it is necessary to determine the age of a bruise. A fresh bruise is a swollen, bluish-purple area of skin. In the next few days, the color of the bruise changes, starting from the edges. From bluish-purple it turns to purple, brown, and greenish-yellow. In addition to changes in pigment, the thickness of the blood layer and the skin covering it are important. Hemorrhages in the skin, mucous membranes and internal organs can also be caused by pathological processes, for example in scurvy, hemophilia, sepsis, phosphorus poisoning, etc. Sometimes bruises are confused with postmortem spots. The significance of bruises for the victim is small if they are few and small. With their significant size and number, they can cause a serious pathological condition due to prolonged painful irritation of peripheral nerves, significant blood loss from the vascular bed, etc. Higher degrees of blunt force action produce violations of integrity in the form of wounds, ruptures of internal parts, organs, crushing and separation of large parts of the body. The properties of wounds from blunt and blunt-edged objects depend mainly on the direction in which the instrument acted. With a vertical direction, simple bruised separations of the skin occur due to its rupture or penetration of the instrument through soft tissues. If the direction is oblique or the instrument slides from the point of impact, mostly flap-like, torn wounds are formed, and the instrument not only penetrates through the skin but also separates it from underlying tissues. Bruised and torn wounds are characterized by irregular shape, crushed, sunken, often jagged and undermined edges, as well as uneven crushing of the parts forming the bottom of the wound. Blunt and blunt-edged instruments can also produce linear separations of the skin, which are difficult to distinguish in appearance from cut, chopped wounds. Such wounds are most easily formed in places where bone lies close to the skin, for example on the head, along the crest of the tibia. They differ from cut and chopped wounds mainly by the properties of their bottom: when the edges of such a wound are spread apart, bridges of tendon threads and vessels are visible in the depth. These wounds should be distinguished from injuries inflicted from the inside by bone fragments. On the extremities, such injuries are known as open fractures. However, injuries to muscle, nerve, etc. by a bone fragment can occur without violation of skin integrity. The same can happen on the head. Bruised wounds bleed little, rarely heal by first intention, more often are accompanied by suppuration due to rejection of dead tissues and subsequent formation of extensive scars, and therefore can be accompanied by significant disturbance of health. A special type of bruised wounds are wounds from bites, which have the character of torn-contused. A characteristic feature of such wounds is the imprint of teeth in the form of punctures and indentations, from which sometimes plastic imprints can be taken. Ruptures of internal organs can occur from impact or counter-impact. Ruptures most often occur from falling from significant height, from collapses, being run over by vehicles, etc. actions of great force, less often from lesser violence - kicks, being thrown to the ground, in newborns from strong body movements (for example during resuscitation according to Schultz) etc. Ruptures mainly affect parenchymatous organs, most often the liver, then the spleen, kidneys, lungs, heart; more rarely - stomach, intestines, urinary bladder and most rarely - the brain, ruptures of which can occur without violation of the integrity of the skull bones. Physiological states of organs can increase predisposition to rupture (stomach fullness, pregnant uterus). Pathologically altered organs rupture more easily than healthy ones. In pathological conditions, so-called spontaneous ruptures can also occur (malarial spleen, liver with echinococcus, etc.). Ruptures of organs may only involve their capsule; in other cases, penetrating ruptures are involved. In the first case, one can speak of tears of organs. Ruptures of organs most often end in death from internal hemorrhage or become fatal due to infection and autointoxication (ruptures of stomach, intestines, urinary bladder). Superficial ruptures heal. Ruptures, strong bruises and crushing of internal organs can also occur with intact skin cover, which is explained by the significant elasticity of the skin. Fractures and dislocations of bones are a frequent consequence of the action of blunt and blunt-edged instruments. The highest degree of ruptures are avulsions and crushing of entire parts of the body. Such destructions occur in railway disasters, being run over by wagons, into machines, from falling from airplanes, etc. Sometimes large parts of the body turn into pulp1. There are cases of traumatic effects in which, in the absence of visible anatomical changes or with only mild changes, severe functional disorders occur in the central nervous system, leading to death. In such cases, concussion of the brain (see Commotio cerebri), spinal cord is spoken of. When falling from height onto the body surface, significant injuries are usually not found or they are completely absent, which is explained by the great resistance of the skin. Usually, however, abrasions, bruises or minor skin wounds are found on the skin. Open fractures of bones are common. Among injuries to internal parts, extensive fractures and cracks of the skull bones, fractures of ribs, spine, pelvis and especially ruptures of internal organs and small tissues are common. Injuries to the head. The immediate phenomena of any skull injury depend on the degree and type of injury to the brain. The latter can consist either in bruising of the brain substance, or in concussion, or in pressure on the brain from fragments of skull bones or blood that has leaked from ruptured vessels of the membranes.
Injuries to brain tissue can occur with an intact skull, or (more frequently) with skull fractures. The phenomena caused by such injuries differ significantly depending on the functional significance of the injured part and the extent of the injury. Initial symptoms from brain injuries may sometimes be minor. There are known cases when foreign bodies (nails, wire, awl, etc.) were introduced into the brain without initially causing severe symptoms. People with such injuries may perform various actions, attend to their affairs, and threatening symptoms only appear later due to subsequent inflammations, abscesses, hemorrhages, etc. Concussion of the brain can occur by itself or as a phenomenon accompanying skull injury. Concussion of the brain may be accompanied by so-called capillary hemorrhages. Pressure on the brain occurs due to hemorrhage into the cranial cavity from ruptured vessels of the meninges or sinuses. Initial symptoms from concussion may be absent or minor, so that even people with fatal injuries may perform complex actions. Pathological symptoms may appear after one or even many hours. Skull fractures--see Fractures. Punctured, cut, and gunshot injuries--see Wounds. Antemortem and postmortem injuries. Not all injuries found on a corpse result from antemortem violence. There are many conditions that can cause injury to a corpse. Such postmortem injuries can easily be mistaken for antemortem injuries. Injuries are particularly often found on corpses that have been in water, on corpses that lay outdoors, on discarded newborns injured by animals. They are observed on corpses that have been cut into pieces. Corpses are intentionally injured with the aim of misleading, for example: placing a murdered person on railroad tracks to simulate an accident. Signs of antemortem injuries include: gaping wounds (antemortem contractility of tissues), bleeding, bruises, swelling and inflammation, although all these signs except inflammation are not always sufficiently reliable. In difficult cases, one must resort to microscopic examination. Antemortem abrasions are characterized microscopically: 1) phenomena of inflammatory reaction--hyperemia, emigration of leukocytes, extravasates, exudate, proliferation of cells of the Malpighian layer. These changes are located at the boundary between healthy and damaged tissues; 2) traumatic changes--degenerative changes in cells up to and including necrosis, hemorrhages, thrombosis of capillaries of the papillae. Postmortem abrasions mostly have a uniform yellowish color. Bruises that show a change in color or extend over a considerable distance and are documented by firmly clotted blood are undoubtedly antemortem. Microscopic examination of antemortem bruises shows a picture of capillary hyperemia and thrombosis of small arteries, which cannot be obtained on a corpse. Research has shown that injuries that occur in the first minutes after death (cessation of heart function) may have a character indistinguishable from antemortem injuries. Bruises on a corpse have been obtained experimentally. One can cause, for example, significant bruises in the epicardium and myocardium by grasping the heart with forceps (a manipulation often practiced during examination of the contents of the cardiac sac). However, such postmortem bruises differ from antemortem bruises in their lesser intensity and especially in that they can be washed away with water or sodium chloride solution, whereas antemortem bruises cannot be washed away.
Classification of injuries. Injuries are divided into fatal and non-fatal. Fatal injuries are those that are causally related to death, regardless of whether the injury caused death mediately or immediately. Injuries that always end in death in all people are called absolutely fatal (rupture of the heart, destruction of the medulla oblongata, etc.). Other injuries that led to death are considered conditionally or accidentally fatal. These include injuries that caused death due to individual characteristics of the organism, for example, ruptures of aneurysms or intestinal ulcers from a slight push, or injuries that led to death due to accidental external circumstances, for example, infection of a minor wound and subsequent septicopyemic processes, tetanus, etc. The expert must explain all this in his conclusion. The immediate causes of death from injuries may be: 1) destruction or gross injury to vital organs (brain, spinal cord, lungs, etc.). The functional disorders associated with these destructions are so clear that it is quite sufficient for the expert to point this out as the immediate cause of death. 2) Mechanical disorders of function of vital organs (compression of the brain and heart by blood that has flowed into the cranial cavity or cardiac sac; opening of the chest cavity). 3) Blood loss--the most frequent immediate cause of death from injuries. This type of death is observed with injuries to the heart, large vessels, parenchymatous organs (liver, spleen). Death from blood loss is recognized by the characteristics of the injury, the presence of blood in the cavities, and anemia of the organs (sharp pallor of the skin, mucous membranes; poorly expressed or absent livor mortis; pallor of internal organs). 4) Shock (see). 5) Suffocation (for example, blood that has entered the respiratory tract from severed vessels of the neck). 6) Local, non-infectious diseases at the site of trauma (traumatic heart defects, edema of the larynx after trauma, thrombosis of venous sinuses after skull trauma). 7) Diseases not dependent on infection and remote from the site of trauma (air and fat embolism of the lungs, brain, aspiration pneumonias, strangulation of a hernia with abdominal trauma). 8) Secondarily acquired infectious diseases--traumatic pneumonias, meningitis, peritonitis, septicopyemia, tetanus, etc. If there are several injuries on a corpse, each of which separately is not fatal, the fatal outcome can be explained by their combination (shock, bleeding). In the presence of several fatal injuries, one speaks of 'competition of causes of death'. It is important for the expert here to determine in what period death would have occurred from each injury alone and in the presence of others. In each individual case, when examining injuries on a corpse, the expert must establish: 1) whether the received injury is fatal (absolutely or conditionally fatal) or not; 2) indicate the immediate cause of death; 3) indicate which of several injuries was the cause of death, or determine whether death is caused by the combination of several non-fatal injuries; 4) whether the injury is antemortem or was received after death; 5) which of several injuries was inflicted earlier than others; 6) explain the connection and dependence between the cause of death and the received injury (in case of infection, for example). When examining non-fatal injuries, one must determine: 1) the nature of the injury (bruise, fracture, wound, etc.); 2) the time the injury was inflicted; 3) the importance of the injury for health and its danger to life; 4) the course of the healing process; 5) the outcome of the injury; 6) whether the loss of working capacity is temporary or permanent and to which group it belongs. In addition, when examining victims, the expert must determine the severity of the injury according to the classification adopted in the Criminal Code of the RSFSR (Articles 142-146 of the Criminal Code). In the Criminal Code, injuries are divided into: 1) serious, 2) minor, not dangerous to life, but causing disturbance of health, 3) minor, not causing disturbance of health. Serious injuries should be considered those that are dangerous to life in their nature or have resulted in complete loss of function of any important organ (vision, hearing, hand, leg), productive capacity, indelible disfigurement of the face, mental illness or other disturbance of health combined with loss of working capacity of not less than one third. When deciding the question of 'indelible disfigurement', the physician should only determine whether the disfigurement is indelible, but the question of the extent to which the injury disfigures the face is decided by the judge, not the physician (see Disfigurement). Minor bodily injuries, not dangerous to life, but causing disturbance of health, are those that have resulted in either permanent loss of working capacity of less than one third, or prolonged disturbance of function of any organ, or any prolonged but not life-threatening diseases. Minor bodily injuries that did not cause disturbance of health should be considered those that resulted in temporary loss of working capacity or temporary weakening of any organ or any minor transient disease.
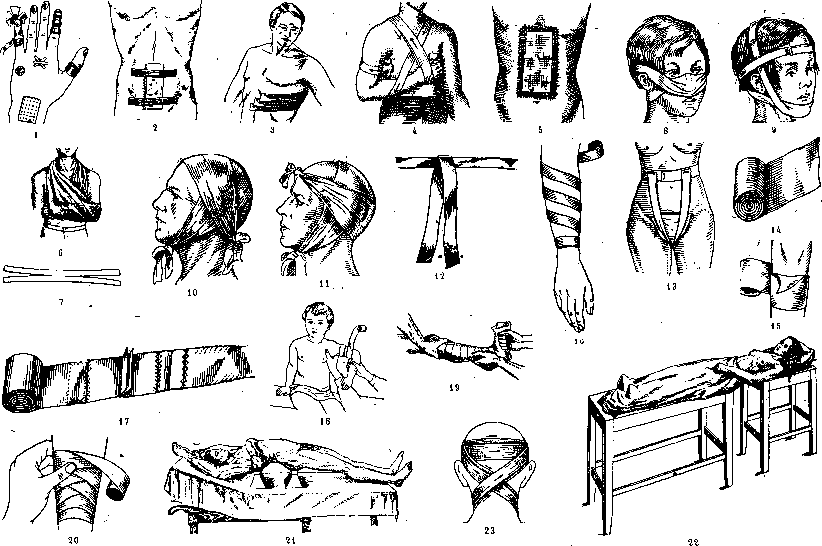
M. Avdeev. DRESSINGS. The term "dressings" is used in two senses. In a broader sense, dressings (P.) refer to everything that is applied to a wound or part of the body for a prolonged period for the purpose of treatment, including both therapeutic measures for the wound, ulcer, etc. (re-dressing), and the various methods of holding the dressing material. In a narrower sense, dressings refer to the external part (shell) of the dressing, not including the therapeutic part. The beginning of the use of dressings dates back to ancient times. Already in sources of ancient Hebrew history, dressings of balm are mentioned; in the works of Hippocrates, mention is made of the use of dry dressings and dressings of an aseptic type, of soaking a rag in wine, alum, copper salts, and of ointment dressings (soaked in vegetable oils), drainage dressings, etc. As material for dressings, sponges and dry leaves were used; to hold dressings-sticky plaster, resins, external dressings of canvas. In the works of Celsus, mention is made of dressings of sponge soaked in vinegar, already fixed with bandages; Galen used drainage dressings of bronze tubes, etc. In the Middle Ages, dressings with tampons (Roger, Roland), with turunds (Guy de Chauliac) and dressings with traction (the same author) were used. The science of dressings (desmurgy) developed most widely in the 19th century. The large number of wounded of the Napoleonic era, the wide development of surgery, and the inability of surgeons to protect postoperative wounds from infection-all this gave enormous numbers of patients requiring dressings, requiring the improvement of dressings and the wide development of the science of dressings. The large number of dressings still in use today was proposed during this period. In the pre-antiseptic era, dressings applied to a wound usually consisted of "corpie," i.e., old rags split into individual threads. Such dressings of corpie were held on the wound with the help of a bandage, mainly cloth. Listers Dressings. The revolution in the question of dressings was brought about by the antiseptic dressings published by Lister in 1867, which became known as "Listers dressings." It is more correct to consider them not as dressings, but as a developed antiseptic method of operation and dressings, with the aim of combating wound infection (see Antiseptics and aseptics). Typical Listers dressings were applied as follows: on the wound or the line of the postoperative suture to protect it from the irritating effect of carbolic acid solution, a piece of green silk taffeta was applied, covered with copal varnish on one side and a mixture of 1 part dextrin, 2 part powdered starch and 10 parts of 5% carbolic acid solution on the other (protective). Before use, the protective was disinfected in a 3% solution of carbolic acid. The disinfecting effect of the dressing was judged by the change in color of the protective, as it blackened when the wound secretions decomposed. Over the protective, Lister placed 8 or more layers of dry carbolicized gauze, and before the last outer layer, a waterproof fabric coated with rubber solution (mackintosh) was laid. The dressing extended far beyond the edges of the wound and was fixed with a bandage soaked in carbolic acid (dry) or with a bandage moistened in a solution of carbolic acid, and this was done in such a way as to achieve a hermetic seal of the dressing and protect the wound from access to air. At first, the application of Listers dressings was accompanied by the spraying of carbolic acid (spray) and was characterized by great complexity, but soon the dressings were simplified and improved, mainly by German surgeons. Spraying, the protective and mackintosh were discarded, and the dressing turned into an antiseptic, dry or wet dressing, which is still widely used today. The effect of antiseptic substances on the wound and on the entire patient's body led to a desire to abandon them and switch to sterile aseptic dressings from boiled water and salt solution-wet (Neuber, 1883) and dry dressings (Bergmann, Schimmelbusch, 1886-1891). Dry Dressing. The theory of dry aseptic absorbent dressing is set forth in the classical studies of Preobrazhensky. The absorbent aseptic dressing should consist of dry, sterile, highly absorbent material (gauze, lignin, cotton) and provide a constant flow of fluid from the wound into the dressing ("physical antiseptic"). Wet Dressings. For the same purpose, wet dressings are used. Among the solutions used, it is necessary to note hypertonic solutions of table salt and magnesium sulfate (10%) and solutions of soda (2%). Wet dressings have the greatest effect with a small amount of thick pus. Due to unsatisfactory results when using aseptic dressings during the world war, antiseptic dressings reappeared: dressings with constant irrigation (Carrel, Dakin-chlorination), dressings with vuzin and rivanol (Moggenroth, Klapp) (see Antiseptics and aseptics* antiseptic substances). Dressings with Drainage. For the same purpose of removing secretions (mainly pus) from the wound, dressings with drainage in the form of tubular drains inserted into the wound-rubber (Chassaignac, Spencer Wells, etc.), glass, from twisted wire, ribbed rubber drains, bundles of catgut or horsehair (filiform drain)-were and are widely used. Ointment Dressings. In recent years, aseptic dressings consisting mainly of indifferent ointments (vaseline, lanolin, with the addition of antiseptic substances) have become widespread. They aim less at therapeutic functions than at protecting the granulations of the wound, surfaces deprived of skin epithelium, etc. from sticking to the dressings and subsequent damage when they are changed. Bir's Dressing Method. In view of the fact that tampons and drains introduced into the wound are foreign bodies to it, which can interfere with regenerative processes and thus delay healing, in recent years a trend led by Bir has appeared, which limits or refuses to introduce tampons or drains into the wound. Ready-made Dressings. In wartime, ready-made dressings become widespread-these are so-called individual packets (see). When using a packet, the main rule is not to touch the inner surface of the compress applied to wounds with hands. When providing assistance in industrial and agricultural trauma at health posts and health stations, improvised simplified ready-made dressings of the individual packet type are widely used. The simplest method of preparing improvised individual packets is as follows: a layer of cotton or a piece of lignin of medium size, measuring 6 cm x 9 cm and about 1 cm thick, is taken, covered with gauze of the same size and folded in half with the gauze inside, with the edges of the gauze slightly bent over the cotton in the middle so that when the dressing is opened, they easily open with the inner side. Such a dressing is wrapped in wax paper or paper measuring 16 cm x 16 cm, placed in a direction from corner to corner, the lower corner of the paper is folded, then the side sides, and finally the upper corner is adjusted inside the packet, which holds the packet from opening even without gluing it. Prepared dressings are sterilized. Dressings in the Narrow Sense. Four main types of dressings are distinguished: 1) ordinary or securing dressings, which serve to fix the dressing material on the wound; 2) pressure dressings, serving to establish constant pressure on a certain area; 3) immobilizing dressings, holding a certain area of the body in a fixed position, and 4) dressings with traction, providing traction to a certain part of the body. The main types of securing dressings: adhesive, collodion, triangular, sling-shaped, T-shaped and bandage dressings. Adhesive dressing is applied with the help of strips of sticky plaster. Two types of plaster are in use. One of them acquires the properties of plaster only after heating on a flame and represents a wide piece of fabric, one side of which is usually covered with a hardened yellow, pink or black mass that becomes sticky when heated on a flame. The more common American sticky plaster-leukoplast-consists of a strip of fabric rolled in the form of a bandage, one side of which is covered with a sticky composition. It has the property of sticking to the skin without heating, as it warms up due to the heat of the body. Sometimes the sticky surface of leukoplast is covered with gauze, which must be removed before applying the plaster. The dressing material on the wound is held with the help of an adhesive dressing as follows (Fig. 1): the plaster is cut in the form of a star or in the form of strips, which are applied crosswise, in the form of tiles, etc., and they should capture the dressing material and extend beyond its edges on both sides onto the skin. The strips of sticky plaster adhere tightly to the skin and thus hold the dressing material. Adhesive dressings are inconvenient on hairy parts of the body, as they stick to the hair, as well as where there is a lot of discharge (they get soaked), and with prolonged use in the same place, they cause skin irritation. Adhesive dressing is convenient for bringing together the edges of granulating wounds, e.g., on the abdominal wall, and it is applied either as shown in Fig. 2, or directly on the granulating surface.
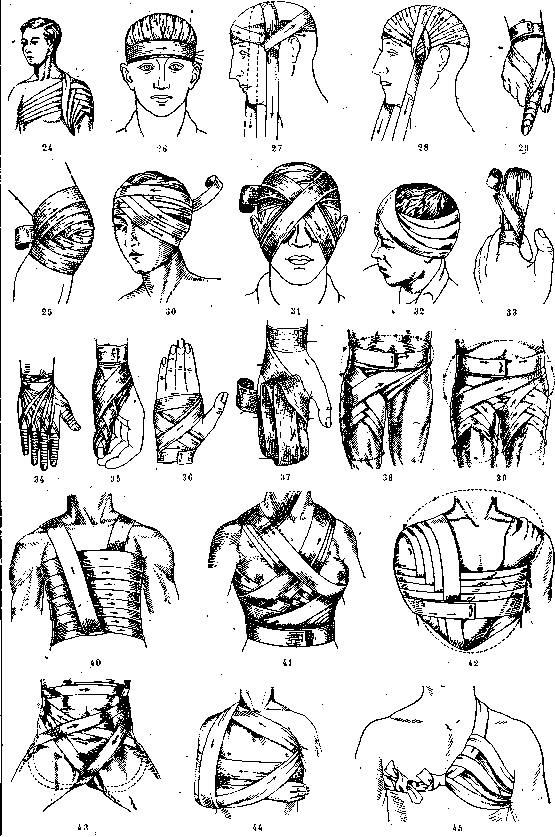
Strips in the form of tiles or with holes (figure 1) are applied directly to the granulating surface in poorly healing leg ulcers (especially varicose ones). Plaster bandages II. on the limbs (see below) are most frequently used for the purpose of traction. P. (fig. 3) consisting of longitudinal strips extending beyond the midline both behind and in front and applied parallel to the ribs in the form of tiles is often used in fracture of the collarbone.-Sayer's bandage (fig. 4), consisting of three strips. Collodion P. Direct pouring of collodion onto small wounds is incorrect, as when infection gets into the wound and due to the collodium layer pus cannot be secreted outward, spread of infection in the tissues may occur. A properly applied collodion P. is very convenient when applied to a postoperative sutured wound or to a wound with slight purulent discharge. The wound is covered with sterile gauze folded in several layers (figure-5), and if there is purulent discharge, it is covered with a small amount of cotton. On top is placed an unfolded gauze pad, extending on all sides several centimeters beyond the edges of the P. These free edges of the upper pad, adjacent directly to the skin, are moistened with collodium, spread with a spatula or cotton swab, and after hardening, they adhere tightly to the skin, holding the entire bandage. When changed after 1-2 days, the P. is difficult to remove, and its removal is painful for the patient; on the 7-8th day it is removed freely. Disadvantages of P.: tightening of the skin, irritation of the skin with repeated P., sometimes appearance of blisters when applying P. to skin smeared with iodine. Just like collodium, other adhesive masses are used: rubber glue, mastisol (colophony 50.0, ether 100.0, turpentine 1.0) or . kleol (Terebint. venet. 15.0, Mastic. 12.0, Co-lophonii 25.0, Resinae albae 8.0, Spiriti vi-ni 180.0).-K o son ocular P.-see Desmurgy. The most commonly used of them is mitella (fig. 6)-a P., suspending the arm.- Sling bandage (funda)- applied with the help of a strip of cloth or bandage, both ends of which are cut longitudinally, and the cuts are not brought to the middle (fig. 7, sling). With its help, small P. can be applied to the nose (funda nasi, fig. 8), chin (funda mandibulae, fig. 9), vertex, forehead (funda parietalis et frontalis, fig. 10) and occiput (funda occipitalis, fig. 11), and when applied to the nose, the uncut middle of the strip covers the nose, and the ends, crossing in the area of the zygomatic arches, are tied behind-one on the occiput, the others on the neck. The application of P. in other areas is clear from the figures.-T-shaped P. If another strip is thrown over the middle of a strip of cloth or bandage, they will look like the letter T (fig. 12). With these two strips, it is convenient to apply P. to the perineal area (fig. 13), where one strip goes in the form of a belt around the waist, and the other in the form of two strips goes through the perineum and in front is attached to the belt. Bandage P.\ are applied with the help of a strip of cloth, knit fabric or gauze in the form of a ribbon 5-7 m long, 5-20 cm wide (fig. 14) (see Bandages). These are the strongest, most convenient and most frequently used retaining P. For bandaging fingers, a bandage 5 cm wide is taken, for the head, forearm, shoulder and leg-7-9 cm, for the thigh and trunk-8-20 cm (figure 17). When bandaging, the following rules are observed. 1. The patient should be in a comfortable position for him so that under the influence of fatigue he does not change his position; the part being bandaged should be immobile and easily accessible to the bandager. It should be at the level of the bandager's chest, in the position in which it will remain after bandaging is completed. Usually, fingers are bandaged extended, hand straightened, elbow bent at a right angle, shoulder joint-with the arm slightly abducted from the trunk, hip and knee-> with the leg extended, foot-in a position at a right angle. The diseased part of the body during bandaging is held, rollers and supports (fig. 21) are placed under the patient, or mobile tables (fig. 22) are used. 2. The bandager stands, facing the patient, to watch his facial expression to see if bandaging is causing him pain. Bandaging on the limbs is done from the periphery to the center, both hands of the bandager participate in it, where the left hand holds the P. and straightens the bandage, while the right hand unrolls its head. 3. The bandage rolls in one direction (most often clockwise), each subsequent turn covers half or two-thirds of the width of the previous one, and there should be no pockets or individual turns of the bandage lagging behind. 4. When bandaging, one of the typical P. described below is used as a plan, adapting it to the case. 5. The P. is most often secured on the side opposite to the disease, with the help of an English pin or by tearing the bandage longitudinally and tying its ends around the bandaged part or attaching them to one of the adjacent turns going in a different direction. 6. After application, it is checked whether the bandage is applied too tightly, whether it covers well and whether it has a tendency to slip. Types of bandage P. In circular P. (fascia, sive dolabra circularis, fig. 15), after placing the end of the bandage on the part being bandaged and holding it with the left hand, the right hand unwinds the bandage, where its turns, going around the bandaged part of the body, lie one on top of the other, covering the previous one. Such a P. is used in bandaging the forehead, wrist area, ankles, and from several circular turns serving to secure the bandage, other P. begin.-Spiral P. (fascia spi-ralis) begins with a circular turn, but each turn of the bandage covers the previous one * only by one third or half its width, rising with such oblique turns upward (ascending P.-f. ascendens, fig. 20) or descending downward (descending P.-f. descendens). With uneven thickness of the limb (e.g., leg, forearm), so that one edge of the bandage does not lag behind and the P. lies more evenly, bends (fascia spiralis reversa) are used, directing the bandage path more obliquely than is necessary for spiral P., holding it with the thumb of the left hand and, unrolling a little, bending it toward oneself (fig. 20), so that its upper edge becomes the lower and vice versa. The more uneven the part being bandaged, the steeper and more numerous the bends are made, and they are all made on one side.-Creeping P. (fascia re-pens, fig. 16) is made only for temporary retention of dressing material. When applied, one turn of the bandage does not touch the next one. - Cross-shaped or figure-eight P. (fascia cru-ciata, s. octoidea) consists of bandage paths going in the form of the number 8 and crossing at one point. When applied to the occipital area (figure 23), the bandage is secured with a circular bandage through the forehead and occiput, then descends along the occipital area from left to the right side of the neck at an angle, goes around the neck and along its left lateral surface rises obliquely through the occipital area under the right ear to the forehead. Further paths are repeated, covering the entire occipital area, and the bandage is secured around the head.-In the spica bandage (fascia spica), the paths also go in the form of the number 8, but each turn of the bandage covers the previous one only partially and the crossing point, located along one line, has the appearance of a spike. The bandage on the shoulder area (zr1ca humeri, fig. 24) starts from the healthy armpit, passing along the anterior and outer surface of the arm of the affected side to the armpit area, and from there around the shoulder to the back with a cross of the previous < path on the outer surface of the shoulder. Along the back, the path goes to the armpit of the healthy side and repeats all previous paths again, partially covering them and lying higher and higher (spica ascendens), until the entire joint area is covered.-Turtle bandage (fascia testudo), converging (inversa) or diverging (reversa), is convenient for bandging a bent knee and elbow. The P. (fig. 25) begins with a circular turn through the most prominent part of the patella. Then the paths go below and above, partially covering the previous ones and crossing in the popliteal area. The following paths cover the entire joint area.-Recurrent bandage (fascia recurrens, fig. 26) is used for bandaging the skull and stump. On the skull it looks like a cap. When applied, after securing the bandage with a circular turn, a bend is made in front and obliquely along the lateral surface of the head to the occiput, where after the bend oblique paths go along the lateral surface of the head on the other side. After securing the lateral paths with circular turns, they are repeated, covering the entire head. The application of P. with a double-headed bandage is more convenient. The disadvantage of P.-its tendency to slip easily. A similar bandage applied with a double-headed bandage is called Hippocrates' cap (mitra Hippo-cratis). P. on individual areas of the body. P. of the head. P. with a cap is quite strong and convenient. When applied, a piece of bandage half a meter long (tie) is torn off and placed with its middle on the vertex area (fig. 27), lowering the ends in front of the ears, where the patient or someone assisting holds them tightly stretched.
Over the ties, make a circular pass over the forehead and back of the head4, then, upon reaching the right tie, wrap the bandage around and go diagonally across the forehead and crown to the other tie, around which the bandage is again thrown and covers part of the back of the head. With such diagonal passes with throws around the ties, the entire head is covered (fig. 28).-Bridle (capistrum). With this P., the bandage is secured around the head, then led diagonally over the occipital region to the right side of the neck; from there the bandage is led under the chin and several vertical passes are made, covering the parietal region. After closing with these passes the necessary part of the cranial vault, the bandage from under the jaw is led diagonally along the left side of the neck to the occipital region and is secured with a horizontal pass around the head. This is the most secure P. for closing the cranial vault; with its help, the area of the lower jaw can also be closed if the first diagonal pass covers the chin from the front.-Bandage
bandage
/ 7C>2
over one eye (monoculus). When bandaging the right eye, hold the bandage as usual; when bandaging the left eye, it is better to bandage from left to right and hold the head of the bandage in the left hand. The P. (fig. 30) begins with a circular horizontal pass, then the bandage descends diagonally over the occipital region and goes under the ear of the affected side and diagonally across the cheek to the forehead, covering the inner part of the eye. The diagonal pass is secured with a circular one, and in the future diagonal and circular passes alternate.--P. over both eyes (binoculus, fig. 31). After securing the bandage with a circular pass, descend over the crown and forehead downward, make a diagonal pass covering the left eye, then, passing under the ear on the left side, lead the bandage along the back of the neck and make a pass going diagonally from bottom to top and covering the right eye. Diagonal passes covering the eyes, crossing in the area of the bridge of the nose, are repeated until the entire area of both eyes is covered. The P. is secured with a horizontal pass.-Bandage over the area of the mastoid process (Kornerscher Verband) is clear from fig. 32. P. on the arm. Spiral P. of the finger (fascia spiralis digiti, figure 29)
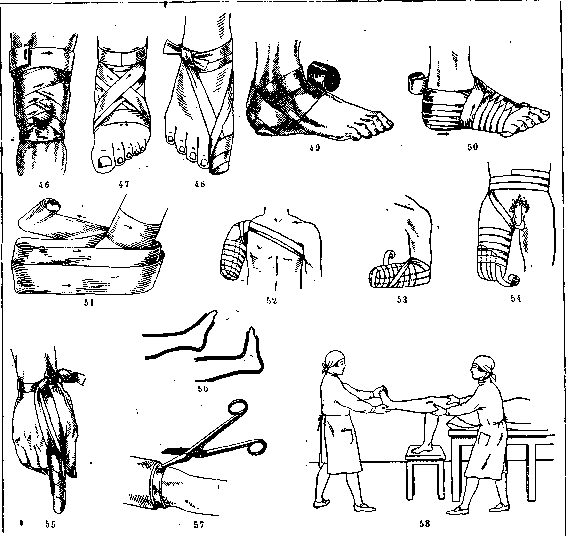
begins with a circular turn in the wrist area, then the bandage goes obliquely across the back of the hand to the end of the finger being bandaged and begins a spiral bandage, wrapping the finger from its end to the base, after which the bandage goes across the back of the hand to the wrist, where it is secured. To cover the entire finger (fig. 33), several turns of a returning bandage are applied, secured at the base, after which the finger is wrapped with spiral turns, as in the previous bandage. A spiral bandage on all fingers takes the form of a glove (fig. 34).-The spica bandage of the thumb (spica pollicis, fig. 35) begins with a circular turn at the wrist, then the bandage goes to the end of the finger and from there, going around the finger, to its dorsal surface, then back to the wrist. In the following turns, they are repeated, ascending higher toward the base of the finger. The bandage is secured at the wrist.-The basket-weave bandage of the hand (fascia craciata manus et carpi, fig. 36) begins with a circular turn, just above the wrist, then the bandage goes obliquely across the back of the hand to the palm, goes around it and ascends up the back, crossing the second turn. In the following turns, they alternate.-The returning bandage of the hand (fascia recurrens manus, fig. 37) begins on the forearm and consists of returning turns, secured with spiral turns.-^The spiral bandage of the forearm-see spiral bandage, fig. 20. Bandage on the chest. The spiral bandage of the chest (fascia spiralis thoracis, fig. 40) is one of the convenient bandages if it is secured by first placing the unwound end of the bandage obliquely across the chest and shoulder and leaving it to hang freely. The bandage consists of spiral turns from bottom up to the axillary areas, after which the free end of the bandage is thrown over the other shoulder in the form of armholes and secured to the bandage on the back.-The cross bandage of the chest (fascia cruciata thoracis) begins with a circular horizontal securing turn, then an oblique turn goes from right to left to the supraclavicular area, across the back transversely to the right supraclavicular area, from there an oblique turn along the anterior surface to the left axilla, crossing the previous oblique turn. From the left axillary area, the bandage goes transversely across the back to the right axillary area, and oblique turns are repeated.-The bandage on the breast (suspensorium mammae) is applied to the right breast with the usual direction of the bandage, but to the left with the direction of the bandage from left to right. Due to this application, the breast is elevated by the bandage. The bandage begins with a circular horizontal turn just below the breast, which is replaced by an oblique turn, encompassing the lower and inner surface of the breast and going to the left shoulder. On the back, the bandage goes obliquely, descending to the right axillary area, encompasses the lower-outer part of the breast, and transitions to a horizontal turn. The turns are repeated, ascending higher until the entire breast is covered.-The bandage on both breasts (suspensorium mammae duplex, fig. 41), like the previous one, begins with a horizontal turn under the breasts, then an oblique turn supporting the right breast, and a circular turn covering the outer-lower part of it, then the bandage goes obliquely across the back to the right axillary area and from there obliquely along the front of the chest, covering the inner and lower part of the left breast and securing with a circular turn covering the outer-lower part of the left breast. The turns covering the right breast are then alternated with turns covering the left. The Desault bandage (Desault, fig. 44) is applied with the arm bent at the elbow at a right angle and pressed to the trunk and consists of a series of turns by which the arm is bandaged to the trunk. When bandaging the right arm, it is more convenient to lead the bandage from left to right. The second part of the bandage begins with a turn along the anterior surface of the chest from the axillary area of the healthy side to the supraclavicular area of the affected side and down the posterior surface of the humerus under the elbow. Supporting the latter and the upper part of the forearm, the bandage further goes to the axillary area of the healthy side, then along the back to the right supraclavicular area and along the anterior surface of the arm under the elbow from front to back and obliquely along the back to the axillary area of the healthy side. The turns of the bandage are repeated, forming two triangles on the anterior and posterior surfaces of the chest.-The Velpeau bandage (Velpeau, fig. 42) is also applied to the arm pressed to the trunk, but1 the latter is placed with the elbow elevated and the hand in the supraclavicular area of the healthy side. With a horizontal turn, the chest is encompassed together with the arm pressed to it, then from the axillary area of the healthy side, the bandage goes obliquely along the back to the supraclavicular area of the affected side, from there along the anterior and outer side of the arm under the elbow, supporting it and the upper part of the forearm, and returns to the axillary area of the healthy side. In the following, a horizontal turn is repeated, positioned somewhat above the previous one, and a turn supporting the elbow (inside the first), until the entire area is covered. Bandage on the abdomen and pelvis. The spiral bandage used to cover the abdomen in its lower part should be secured to the thighs by connecting the spiral bandage with the spica bandage of the inguinal area, as it has a tendency to slip upward. The spica bandage of the inguinal area (spica inguinalis, fig. 38) is used to cover the inguinal area, the upper part of the thighs, the lower part of the abdomen, and the buttock area, depending on where the cross is made (in the inguinal area, to the side or at the back). The bandage is secured with a circular turn in the lower part of the abdomen, just below the pelvic bone crests, then (for a right inguinal bandage) the bandage goes behind along the lateral and anterior abdominal wall to the inguinal area and along the anterior surface of the thigh. Passing to its inner surface, it goes around the posterior semicircle of the thigh, crosses the previous turn in the inguinal area, ascends along the anterior surface of the abdomen and goes around the posterior semicircle of the trunk. In the following turns of the bandage, they are repeated, positioned higher or lower than the previous ones and secured with a horizontal turn around the trunk.-The spica bandage on both groins (spica inguinalis bilateralis, fig. 39) begins, like the left inguinal bandage, with a circular horizontal turn, then the bandage goes along the anterior surface of the abdomen to the left groin, along the outer, posterior, inner and anterior surfaces of the left thigh with a cross of the previous turn. Going around the posterior semicircle of the trunk, the bandage goes along the outer and anterior surfaces of the abdomen to the right inguinal area, makes a turn around the inner and posterior semicircles of the right thigh and ascends to the inguinal area, crossing with the previous turn. In the following turns, the turns of the left inguinal bandage alternate with those of the right.-Bandage on the perineum. The figure-of-eight bandage of the perineum (fascia octoidea perinaei) consists of figure-eight horizontal turns around both thighs with a cross at the perineum. To prevent the bandage from slipping, it should be secured by applying the previous bandage over it. The perineal bandage shown in figure 43 begins with a horizontal turn securing the bandage around the abdomen, then the bandage goes along the anterior surface to the right inguinal area and along the inner surface of the same thigh to the perineum, where it transitions to the posterior surface of the left thigh, goes around it behind and returns to the anterior surface of the abdomen. Passing from left to right along the anterior surface of the abdomen, the bandage goes to the posterior surface of the trunk and goes around it. Transitioning to the left lateral area, the bandage goes to the left groin, to the perineum and, going around the posterior semicircle of the right thigh, returns along the anterior surface of the abdomen to the lumbar area. All these turns are sequentially repeated, with crosses at the perineum positioned higher and lower than the previous ones, covering the entire perineum. Bandage on the lower extremity. On the thigh and calf, an ordinary spiral bandage is applied, on a bent knee-a turtle bandage, on a straightened knee-of the figure-of-eight type (fig. 46), with circular turns made above and below the knee, and oblique turns crossing throughout the popliteal fossa.-Bandage of the heel area (tes-tudo calcanei, fig. 49) begins with a diverging turtle bandage, with the first turn going through the most prominent part of the heel tuberosity, the following ones higher and lower than the previous ones. These turns should be secured with oblique turns on both sides of the heel. After the oblique turns, figure-eight turns follow, covering the ankle area and the upper part of the foot with a cross at the bend of the foot.-The figure-of-eight bandage of the ankle joint (fascia octoidea pedis, s. stapes, fig. 47) begins with a circular turn above the ankles, then the bandage descends along the dorsum of the foot to the sole and goes around the foot, ascends along the dorsum of the foot, and, crossing the second turn and going around the ankles, repeats the previous turns.
Crosses are made either above or below the previous turns. -A bandage for the entire foot (spica pedis, fig. 50), not including the toes, consists of turns of the bandage from the heel to the base of the toes, alternating with circular turns rising from the base of the toes to the ankle joint. -A returning bandage of the foot (f. recurrens pedis, fig. 51) begins with a circular turn at the ankles, then turns are applied along the foot on its lateral surfaces from the heel to the big toe. These turns should be applied without any tension, as tightly applied turns cause bending of the toes and are agonizing for patients. Upon reaching the ends of the toes, the entire foot is wrapped, using a bandage of the spiral type or the bandage shown in fig. 50.-A spiral bandage of the big toe of the foot (fascia spira-lis hallucis, fig. 48) begins with a horizontal turn at the ankles, then the bandage is led to the end of the toe, encircles it, and wraps the toe with spiral turns from its end to the base. After this, the bandage goes to the ankle area and is secured there.-Bandages for stumps of limbs are made according to the returning type (fig. 52-54), and if the limb was amputated slightly below the joint, the bandage for strength is fixed above the joint. Questions of economy of bandage material, and to some extent of time, force the use of simplified bandages, examples of which are shown in fig. 45 and 55. Pressure bandages. For applying pressure bandages, gauze or preferably elastic bandages are used. When uniform pressure is needed, the bandage is applied like an ordinary gauze bandage but tighter, and on limbs, the entire limb is usually included, starting from the toes, and bandaging is done from periphery to center. When pressure is needed only in one place, a bulky piece of cotton is placed in the corresponding area, over which a bandage is applied with considerable tension. Immobilizing, or rather retaining, bandages aim to deprive the affected part of the body of the ability to move and thus ensure it rest in a certain position for a prolonged time. Their area of application is very extensive. First, they are used for fractures of limb bones, both for first aid to temporarily immobilize the fracture area, and for further outpatient or hospital treatment. A properly applied immobilizing bandage after correct reduction of fragments holds them in that position, not allowing them to shift, thereby weakening pain, decreasing bleeding from ruptured vessels, and union occurs in the correct position of the fragments.4At the same time, immobilizing bandages allow the patient to move somewhat, and in some cases even to get up, while the affected part remains immobile due to the bandage. Another, no less extensive area of application of immobilizing bandages is inflammatory diseases of the limbs, especially of the joints, in particular bone-joint tuberculosis, in which immobilizing bandage is one of the main methods of outpatient treatment. Furthermore, immobilizing bandages are used after operations on bones and joints of the limbs. Rules for applying immobilizing bandages. All those rules that were stated in the description of bandage applications, with special care must be applied when applying immobilizing bandages, since the bandage is often applied for a long time (11/2-2 months) and an error in its application can cause irreparable harm to the patient. Sometimes an immobilizing bandage is applied for such long periods that movement in the corresponding joint may not resume. In such cases, it is especially important that the limb be fixed in a position that would allow it to be used in the future, i.e., that the leg would be in an extended position, the elbow bent at a right angle, the shoulder abducted from the trunk, etc. It is necessary to watch very carefully so that there is no uneven pressure from the bandage, especially on bony prominences, as this easily leads to bedsores; it must also be remembered that in some cases (especially often in the first days after a fracture) swelling of the injured member occurs and the pressure from the bandage increases. To reduce the danger of pressure on bony prominences (olecranon process, malleoli, condyles) and the effect of fluctuations in limb volume, before applying the bandage, the entire area where it will be located should be well wrapped in cotton. When applying the bandage, it is very important that the limb be held well and correctly, which is most important in fractures, when it must be held with constant and even traction. Examples of how the upper and lower limbs are held are shown in fig. 18, 19 and 58. Special attention must be paid to ensure that the position of the limb in the joints does not change, as even slight bending can cause cracks and folds in the bandage (fig. 56), which exert uneven pressure. Immobilizing bandages are of two types: hardening (non-removable) and splint (removable); The most important hardening bandages: plaster, starch, glue. Hyp- 7 V 7
ABSORBENT WELL
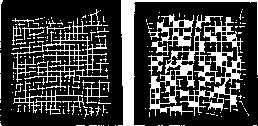
68 ^ . plaster bandage-see Plaster bandages, corsets, splints. Starch bandage-one of the most frequently used hardening bandages. For its application, starched gauze bandages are used, which have a rare fabric mesh and much starch in the form of transparent plates filling the fabric cells (fig. 59). Bandages are prepared of various widths, depending on the area to be bandaged, about 31/2 meters long, and when preparing, the gauze must be cut, not torn (so that starch does not spill); bandages are not rolled tightly (better to moisten). For strength, cardboard strips are inserted into the outer layers of the bandage. As with any immobilizing bandage, before its application, the limb is set in the correct position, thoroughly covered with cotton, especially in places where there are bony prominences, and the cotton is held in place with an ordinary bandage. At the same time, the starched gauze bandages are dipped for a few minutes in a basin of hot water to cook the starch, until they are moistened and become soft. The water temperature should be as hot as the hand can tolerate. A tightly rolled bandage can be slightly kneaded to speed up moistening. The necessary bandages for applying the bandage are slightly wrung out so that water does not drip from them, and bandaging is begun with some tension of the bandage, but not too tight. All types of bandage applications can be used for bandaging, but on limbs, the spiral bandage without bends is predominantly used, replacing them by cutting the bandage. The limb is covered with 3-5 layers of starch bandage, and each layer must be well fitted for better adhesion of the layers. If starched bandages are not available, the bandage can be made of cloth or gauze bandages, smearing each layer with ordinary paste (a spoonful of starch or flour is mixed with a few spoons of cold water and boiled with boiling water). The bandage dries within 1-2 days. It is removed with bandage scissors (fig. 57), with the blades passed between the cotton padding and the starch bandages. The advantages of the bandage are its lightness and the availability of materials for its manufacture. The disadvantages are the slow drying time, due to which the position of the limb may change, and easy absorbency, after which the bandage becomes soft. Glue bandages. Immobilizing bandages can be made with the help of any other hardening substances having the character of glue. Bandage from carpenter's glue. By soaking strips of cloth with liquid carpenter's glue and drying them, they can be rolled into short bandages. After warming the glue by dipping such strips in hot water, a bandage can be applied to the affected member over a padding.
When
Upon drying for 4-8 hours, a dense dressing is obtained. For elasticity, 3-4 tablespoons of glycerin are added to the glue per 1 liter of adhesive mass. The dressing easily softens upon contact with pus, blood, etc. The dressing from liquid glass, i.e., sodium silicate, is very simple. A soft muslin bandage is moistened in liquid glass and applied in 3-5 layers over a padding. The dressing is then coated with a layer of glass. It hardens in 3-4 hours. Modification of the glass dressing—a cement-glass dressing does not soften from water, is as strong as a plaster dressing, but hardens more slowly. A dressing made from cottage cheese with 1 part by weight of spirits of ammonia or 10% caustic potash is convenient in rural settings when other hardening substances are unavailable. The mixture is ground in a mortar and used to coat fabric bandages. A dressing from celluloid. Pieces of celluloid are dissolved in acetone and the resulting glue is applied to the layers of a muslin bandage. Dressings from dextrin, airplane lacquer, and other substances are applied similarly to the previous ones. Adhesive substances are more often used for applying removable dressings-corsets. Splint dressings. With splint dressings, immobility of the affected limb is achieved by bandaging it to a rigid plate of various kinds and shapes, called a splint. To accommodate depressions and irregularities on the affected part of the body and to protect from pressure of the hard splint on bony prominences, padding is placed between the splint and the limb, i.e., most often cotton wool, which is also used to line the splint. Only in the absence of cotton wool, e.g., in emergency cases, can clothing of the patient, tow, moss, etc. be used as padding, or one can even temporarily do without any padding. The splint is secured to the limb with bandages, triangular bandages, and in extreme cases, strips of fabric. Splint dressings are irreplaceable when providing first aid for all kinds of limb injuries, for example fractures. They are applied with the aim of temporary immobility, e.g., until the patient is transported to a hospital, with the great advantage of splint dressings being their simplicity and the possibility of finding necessary materials in any situation. Additionally, splint dressings are often used for all kinds of inflammatory diseases and injuries of the soft tissues of the limbs, where it is necessary to temporarily remove the dressing for massage, bandaging, etc. Depending on the material and area of application, splints have various shapes and forms (see Splints); dressings with traction—see Traction.
Related articles
Cite this page
“Injuries.” Soviet Medical Encyclopedia. English translation of Bolshaya Meditsinskaya Entsiklopediya, 1st ed. (Moscow, 1928–1936), ed. N. A. Semashko. https://sovietmedicalencyclopedia.pages.dev/article/injuries/