Fillings
Historical document, translated for reference. It reflects medical knowledge of the 1920s–30s and is not medical advice.
Summary
This article from the 1928–1936 Soviet Great Medical Encyclopedia details the clinical procedures for dental fillings. It covers the preparation of carious cavities, the importance of moisture control, and the use of various tools and techniques to ensure successful restoration.
Encyclopedia article (1928–1936)
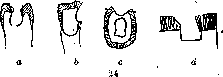
FILLINGS, FILLING. By tooth filling is understood the filling of defects in the hard tissues of teeth with such preparations that would, to a greater or lesser extent, correspond to the substance of the tooth (see Filling Materials). Filling achieves, on the one hand, the restoration of the anatomical form of the tooth, which is usually disturbed by the carious process, and on the other, the cessation of the further development of this process. Tooth filling consists of a whole series of steps, closely connected with one another and sometimes requiring great skill and patience from the physician. The first step of tooth filling must be considered the preparation of the carious cavity. Here, one must unconditionally take into account the material used, depending on the properties of which are the various peculiarities in the preparation of the carious cavity. However, there exist principles for the preparation of carious cavities for fillings that are common to all filling materials, namely: 1. The carious cavity must not have thin, transparent enamel edges. The latter, at the edges of the cavity, must be treated in such a way that it does not chip off after filling the cavity, following the course and arrangement of the enamel prisms (Figure 24). Special attention must be paid to this when filling frontal teeth. 2. Near the carious cavity, especially on the chewing surface, no suspicious spots or cracks should be left, especially on fissures at the places where they intersect. If one imagines the chewing surfaces of molars and the possible locations of caries on them (Fig. 21), it becomes clear what significance this has. All suspicious spots and cracks, in which the thin edge of a probe is caught, must be connected to the carious cavity, and here it is even necessary to include a portion of healthy tissue for prophylactic purposes—to protect the tooth from the occurrence of caries near the filling. In general, one must remember that in dentin, as a softer substance, the cavity is always wider, and therefore, immediately upon opening it, one can ascertain the presence of overhanging enamel edges, which must necessarily be removed and beveled in a direction oblique to the bottom of the cavity. 3. Not even the slightest parts of softened dentin should remain in the cavity. Usually, in shallow caries, this is very easily achieved; but when there is a carious cavity whose bottom is located quite close to the pulp, it is often necessary to leave pigmented, not entirely hard parts of dentin, but before filling such cavities, one must thoroughly disinfect them. 4. Every carious cavity, on whatever surface of the tooth it may be located, must, if possible, be treated so that it becomes central, i.e., so that it has a bottom and all walls around it; this creates a box-like shape of the cavity. 5. If the carious cavity is located in the interdental space of two closely contacting teeth, then these teeth must be separated even before the preparation of the cavity. This is sometimes easily achieved by a cotton pellet tightly inserted between the teeth for 24-48 hours, or for this purpose, one has to use special separators (Fig. 3). The use of this screw device significantly increases the interdental space, and after filling, as soon as the separator is removed, the teeth again assume their original position and form the previous contact point between them. In doing so, however, one must try not to damage the gingival papillae, which especially applies to separation with cotton. Special files for separating teeth are also used (Fig. 1). As for the various peculiarities in the preparation of cavities for one or another filling material, in those cases where an adhesive (possessing the property of sticking to the walls of the cavity) material is used for filling, the preparation of the cavity does not require any special features. Otherwise, when the filling is fixed in the carious cavity only mechanically, it is necessary, according to the peculiarities of the material, to create conditions in the carious cavity that facilitate the fixation of the filling. Giving the carious cavity one shape or another is performed by special burs of various shapes and cuts (Fig. 4), which are set in motion by a dental engine (see). The second, no less important step in filling carious cavities is the absolute dryness of the cavity. Most filling materials do not adhere at all to moist cavities, and all work in such cases is lost. It is also known that the access of moisture to the carious cavity during filling, even if one somehow manages to bring the filling of the cavity to an end, very soon leads to the formation of recurrent caries. The method of using cotton rolls, with which the tooth to be filled and two or three adjacent teeth are surrounded on two sides, is widely used; at the same time, they push back the tongue and cheek and make the field of operation more accessible for observation and operating. If one is dealing with lower molars or premolars, it is not enough to surround only these teeth with cotton rolls: saliva flows in abundance to the cavities of these teeth from Stensen's duct, located above them. That is why, at the location of the exit opening of this duct, in the region of the upper molars, one must first of all place a cotton roll. Still, this method does not provide guarantees, especially in the case of the need for a more or less prolonged maintenance of the carious cavity in dryness. Almost always, by the end of the filling, the cotton rolls become saturated with saliva and, in themselves, moisten the cavity. A reliable method is the application of a rubber dam.
The principle of applying a rubber dam (Fig. 2, 5, and 20), which is a rubber sheet, consists in the fact that the entire oral cavity is lined with it, extending onto the lips, and only the teeth upon which one has to operate protrude freely into the oral cavity. The technique of applying a rubber dam is quite complex and requires some skill. However, this method is not widely used, apparently because it is quite laborious and is not applicable in mass dentistry. To simplify the entire process of applying a rubber dam, Denham long ago proposed his rubber cup, which is very easily and simply placed on the tooth and fixed with a clamp (Fig. 6, 14, 16, 22, 23, 42, and 43). However, no matter what method we use, the carious cavity must still be dried before filling by wiping it with alcohol and ether. The latter, in particular, dries the dentin well, so that the walls of the carious cavity become matte in the process. There is also a routine method of drying cavities by means of a rubber air syringe with a metal tip. By holding the metal tip of the syringe over an alcohol flame and squeezing its rubber bulb, warm air is drawn into it, which is then blown into the carious cavity. At the present time, the air syringe is not so widely used, and in some clinics it is not used at all, since it has been experimentally established that there is a possibility of introducing microorganisms into the cavity when using this apparatus. Gold filling. The cavity must be prepared in such a way that its walls and edges are dense and smooth. There are two methods of gold filling: cohesive and non-cohesive. For the cohesive method, anchor points (Fig. 26 and 27) or grooves—small pits or fissures, not particularly wide or deep, approximately 0.1 mm—are prepared in the cavity. In some cavities, it is sufficient to make one anchor point; in large cavities, their number may be greater. The principle of the non-cohesive method is that gold cylinders, correctly placed in the cavity and well pressed and condensed against each other by manual pressure, form a well-seated plug, which is retained at the wider base of the box-shaped cavity. Tin-gold is currently not used at all for filling purposes. Amalgam filling. For amalgam fillings, the cavity must be prepared so that its bottom is somewhat wider than the exit opening. Amalgams do not adhere to the walls of the carious cavity and are fixed in it exclusively by mechanical means. If the bottom of the cavity is wider, then a well-condensed and fully hardened amalgam is retained in it. Even loose, old amalgam fillings are difficult to remove, and they have to be broken up with a bur. Where the cavity cannot be prepared in this way, grooves are drilled on the walls at its very exit with a wheel-shaped bur, which serve as anchor points for the amalgam. To prepare the filling, the required amount of filings and a few drops of mercury, which is usually kept in a special wooden dropper, are poured into a small mortar. The filings and mercury are thoroughly mixed with a glass pestle until a plastic mass is obtained. Excess mercury is squeezed out of this mass through a clean napkin or chamois, while trying to ensure that enough mercury still remains for the viscosity and plasticity of the amalgam. No matter how high the quality of the amalgam, it still contains some amount of impurities, and therefore, before use, after squeezing out the excess mercury, the amalgam must be well washed in the mortar with ammonia, and then with a soda solution, which makes it completely clean and light silver. Copper amalgam is manufactured in the form of dark gray metal plates, which already contain mercury (see Filling materials). To prepare a filling from these plates, they are placed in a special metal spoon and heated over an alcohol flame until droplets of mercury appear on them; after this, they are easily ground in a small mortar with a pestle until a plastic mass is formed. It is best to use a Roger spoon (Figure 32), and as soon as mercury appears on the amalgam plates upon heating, the spoon is closed with the upper moving lid and Figure 1. Separation files. Figure 2. Rubber dam punch forceps. Figure 3. Separator. Figure 4. Burs of various shapes: 1-pear-shaped; 2-oval; 3-fissure; 4-kidney-shaped; 5-inverted cone; 6-conical; 7-wheel-shaped. Figure 5. a-shape of the rubber dam and holes in it for the upper incisors; b-shape of the rubber dam for the lower incisors; c-for the canine, premolars, and first molar of the upper jaw. Fig. 6. Clamp forceps. Figure 7. Fletcher's scales: a-for filings; b and c-for mercury. Figure 8. Edges covered with mass. Figure 9. Contouring. Figure 10. Dividing the cement into parts. Figure 11. Mixing cement: the spatula is held short and worked with its entire surface. Figure 12. Asbestos-lined impression. Figure 13. a-muffle with asbestos; b-tweezers with impression; c-eyelet-handle of the muffle. Figure 14. Special clamp for anterior teeth with cervical caries. Figure 15. Electric apparatus for mixing amalgam. Figure 16. Clamp advanced into the rubber dam hole: a-clamp branches outward; b-clamp bow outward. Figure 17. Gutmann's stick. Figure 18. Mitchell furnace with rheostat and pyrometer. Figure 19. Dahl's set. Figure 20. Rubber dam placed on the lower incisors: a-weight. Figure 21. Preparation of cavities on the chewing surface: a-chewing surface of premolars; b and c-chewing surface of molars. Figure 22. Clamps. Figure 23. a-correctly applied ligature; b-gingival papilla captured. Figure 24. Preparation of the enamel edge of the cavity (d-left incorrect, right correct): a, b, c-beveling of sharp enamel angles. Figure 25. Short test tube for mixing amalgam. Figure 26. Cervical caries: a-anchor points; b-box-shaped cavity; c-shape of the cavity before preparation. Figure 27. Anchor points in proximal cavities: a, c-anchor grooves; b-anchor points. Fig. 28. a-cavity with overhanging edges; b-cavity formed with cement. Fig. 29. Finished inlay: a-cemented inlay; b-cavity; c-inlay. Figure 30. Preparatory cavities for inlays. Figure 31. Cavity preparation and shape of the inlay and burs. Figure 32. Roger spoon. Figure 33. Filling the cavity with tin-gold: a-cylinders lining the bottom of the cavity; b-cylinders placed against the walls of the cavity; c-plugger. Figure 34. Filling with notches. Figure 35. Wheel for notches. Figure 36. Anchor points in the cavity. Figure 37. Large amalgam filling on a post; the post in the distal root canal is indicated by a dotted line. Figure 38. Band ring. Figure 39. Filling tied to the tooth. Figure 40. Inlay held by tweezers. Figure 41. Pressing in the foil. Figure 42. a-Denham's cup; b-cup fixed with a clamp on a molar. Figure 43. a-Harvard clamp (b) with pads on the tooth.

gzhshchshch I * o o oeo" b c




f" «1"
is shaken well several times; when closed, the amalgam continues to melt but does not burn out, as often happens in an open spoon. The question of mixing filings with mercury, i.e., what amount of mercury is required for a given amount of filings to obtain an amalgam of optimal viscosity, is very important. If less mercury is taken than required, the amalgam does not have sufficient plasticity and viscosity. Conversely, with an excess of mercury, it must be squeezed out, and in this process, the more easily soluble components of the alloy are also squeezed out. It is, of course, important that the filings and mercury are in a known quantitative ratio, and special Fletcher's scales (Fig. 7) have been proposed for this. The usual ratio is 4 parts filings to 1 part mercury. A more plastic amalgam can be obtained by mixing three parts filings with one part mercury. It must be said, however, that for filling central cavities, it is better to take a less plastic amalgam, and here a 4:1 ratio is quite suitable. For building up the contour parts of a filling, it is better to prepare a more plastic amalgam, and here a 3:1 mixture is preferable. Thorough mixing of the filings with mercury is also important. In recent years, it has been proposed to perform amalgamation with a special automatic device, in which, through strong rotation of the filings mixed with mercury, a completely plastic and uniformly prepared amalgam is obtained after a few minutes. One can also use a short test tube into which the filings and mercury are poured, the opening is closed with a finger, and it is shaken vigorously up and down (Figs. 15 and 25). The technique of amalgam filling is simple. Since amalgams are insensitive to moisture, it is sufficient to surround the tooth to be filled with cotton rolls. The cavity is dried in the usual way—with alcohol, ether—after which filling begins. The amalgam is introduced into the cavity in small portions and well condensed (pressed) against its bottom and walls with special headed instruments or special pluggers with rough edges (see Dental Instrumentation). Condensation of the amalgam must be performed especially carefully: one must strive to ensure that all grooves, all support points, and the entire cavity in general are tightly packed with amalgam. A major inconvenience is the fact that amalgam hardens very slowly; this takes 2-3 hours on average, and the patient, by careless chewing, can destroy the contour parts of the filling built from amalgam. In such cases, rings of soft metal, which are placed on the tooth before filling and can remain there until the filling has completely hardened, are of great service. These rings protect the filling from destruction of its contour parts during chewing; the next day, the ring is easily removed, and the filling is polished in the usual way. If the cavity is located on the interdental surface—an approximal cavity—one can use matrices—thin metal, easily bendable plates of various shapes and sizes (Fig. 38). One often has to deal with severely destroyed molars or premolars, where ordinary fillings cannot have a sufficient base for their fixation. In the vast majority of cases, these are pulpless teeth, and therefore one can use the canals to create support, retention points for the filling. Amalgams are very reliably secured here on a post, which is achieved as follows: in one wide canal of molars or in the canal of a single-rooted premolar, a fork-shaped or bayonet-shaped post is fitted, which, with the mouth closed, should not tightly reach the opposing surface of the opposite tooth. A ring of soft metal is placed on the tooth, the cavity is thoroughly dried, and the canal is filled with liquid-mixed cement, with which all walls of the cavity are also lined. Then, after the post is secured, the entire cavity is tightly filled with amalgam, the bite is checked, and the ring remains on the tooth until the next day. After removing the ring, the amalgam is firmly connected to the cavity by the cement and the post on which it is held (Fig. 37). At present, in connection with new indications regarding the harmfulness of amalgam fillings, special attention must be paid to the thorough condensation of amalgam during filling. Well-condensed parts of amalgam harden faster, acquire the appearance of an ingot after this, and are well polished. In this regard, one should recommend the rotational method of amalgam filling by Herbst, which consists in the fact that condensation is performed by burnishers driven by a dental engine. It must be said that amalgam fillings are the most common and quite justly enjoy the trust of both doctors and patients. They are indicated in all cases of caries, especially on the chewing, cervical, and approximal surfaces of molars and premolars. Their major drawback is their unsuitable color and significant thermal conductivity. But they are extremely resistant to oral cavity secretions and mechanical impacts. Amalgam placed in a carious cavity with well-prepared edges can serve for several years.
Cement fillings. For cement fillings, the carious cavity does not require special preparation: this plastic filling material possesses significant adhesiveness and adheres well to the walls of the cavity, even in the absence of any support points and grooves. However, the edges of the enamel must be smoothed and beveled, and, if possible, it does not hurt to also make support grooves or points in the healthy, thick layer of dentin. Cement is especially sensitive to moisture, and therefore the drying of the cavity must be very thorough. However, in this regard, one should not cross certain boundaries: excessively dried dentin absorbs the free, as yet unbound acid from the plastic mass of the cement significantly faster, and this, on the one hand, causes irritation of the pulp in living teeth, and on the other, disrupts the optimal ratio of the filling's ingredients. Mixing of the cement is performed as follows: on a clean glass or porcelain plate, the necessary amount of powder is mixed with the liquid using a blunt spatula, with the powder being gradually added to the liquid and rubbed into it with the spatula until a dough-like mass is obtained that does not stick to the fingers. It is necessary to make it a rule to pour the powder onto the glass first, and then the liquid, with the powder best poured directly from the bottle in which it is contained (Figs. 10 and 11). Then, the liquid is drawn up with a pipette and transferred to the glass next to the powder. The entire amount of powder is divided into two or three parts, which are gradually rubbed into the liquid until a dough-like mass is obtained. The cement is considered ready when the spatula no longer pulls the dough with a thread, but tears away from it, leaving an uneven fracture surface.
532 The filling process itself consists of taking small pieces of cement with a filling instrument, introducing them into the cavity, and condensing them well against its walls and floor. In this way, the entire cavity is filled. After this, all contours of the tooth lost to caries are reconstructed from the cement. One should not build particularly high edges and corners from cement, since it does not have great durability. When the filling is ready, it is covered with sandarac or collodion, thanks to which a film forms on its surface, protecting it from the influence of oral fluids, at least in the first hours, until the cement hardens completely. Some brands of cement have a neutral varnish for this purpose. It is also possible to pour paraffin over fresh cement fillings, which is melted on a spatula over a spirit flame. Paraffin surpasses all varnishes proposed so far for this purpose and protects the filling from chemical influences for several hours. Grinding and finishing of cement fillings is performed with carborundum stones and wheels, paper discs, etc. It is best to perform the finishing of the filling on the second day. The described filling technique applies to all cements in general. When working with silicate cements, one must try to mix the powder with the liquid into a thicker mass; however, this thickness should not be achieved by quickly stirring a large portion of powder into a small amount of liquid; on the contrary, the thickness of the cement paste is achieved by gradual and energetic stirring of the powder into a sufficient amount of liquid, and the slower and more energetically the powder is rubbed, the better the consistency of the filling. Silicate cements do not possess such stickiness as phosphate cements, and therefore one cannot rely particularly on their adhesiveness and must take care beforehand about fixing points in the cavity itself. Filling instruments must be smooth, and their working part—heads, burnishers, etc.—must be made of stainless and non-oxidizing metals in order to preserve both the color and chemical properties of this material. The most insignificant reactions significantly change the transparency and color of silicate cements. Finishing of silicate fillings is performed on the second day or 3-4 hours after filling, and both stones and paper discs are best covered with petroleum jelly so that there are no scratches on the filling and so as not to deprive it of its luster. With a good selection of color, one can achieve a completely normal tooth color, for which it is sometimes necessary to mix powders of two colors. Gutta-percha filling. Since gutta-percha is used for temporary fillings, no special preparation of the cavity is required. The use of cotton rolls to maintain dryness in the cavity is quite sufficient. The filling technique consists of heating the gutta-percha over a spirit flame and introducing it in small pieces into the cavity, where it is subjected to condensation with head-shaped instruments. After filling the entire cavity, the gutta-percha is smoothed toward the edges of the cavity with a heated burnisher, and the filling is given the necessary shape. When using hard grades of gutta-percha, smoothing of the filling is easily achieved by lubricating it with chloroform. Porcelain filling, porcelain inlays. There are two methods of filling with porcelain inlays: the Jenkins method, in which the porcelain inlay is fired in each individual case according to an exact gold measure, and 2) the Dahl method, in which an already finished inlay is precisely ground to the cavity and secured with cement. The Jenkins method is more common. All work with it falls into 5 moments: 1) preparation of the cavity, 2) taking an impression, 3) asbestos embedding of the impression, 4) layering and firing of the porcelain, 5) securing the inlay. The cavity prepared for a porcelain inlay must meet the same requirements as for a gold inlay. In cases where the edges of the cavity cannot be removed, if it is desirable to preserve them despite thin parts of the enamel, this can be achieved by forming a base of phosphate cement in the cavity (Figs. 28 and 30). In any case, the edges of the cavity must be thin and smooth, which is achieved by finishing with subsequent polishing of them. Obtaining an impression. For this purpose, gold foil is used - "Standard Gold R. V. Williams" No. 30. A piece of foil of the required size, square or oblong according to the shape and size of the cavity, is placed over the cavity and gradually pressed into the cavity with light pressure using cotton balls so that it is entirely lined with gold foil and so that the edges of this foil extend onto the enamel of the tooth (Figure 41); they must be firmly pressed and smoothly smoothed to this latter so that there are no folds on the gold. In deep cavities, and especially with careless manipulation during the pressing of the gold foil into the cavity, tears occur in one area or another adjacent to the floor of the cavity. This is of no particular importance, provided that the edges and their transition into the walls of the cavity are well preserved. This gold impression is the exact form of the cavity with all its features, and the filling is formed and fired in it; but for this, it is first fixed in a special muffle with asbestos. This is necessary so that the thin foil does not change its shape during work from being touched, and also to prevent the influence of high temperature during the firing of the porcelain, which can also change the shape of the impression. Asbestos embedding. The best packing mass for this purpose is asbestos in powder, which with a small amount of water gives a mixture of creamy consistency. In a special nickel or platinum muffle (Fig. 13), asbestos is placed in the form of a mound, and the gold impression is placed on it. After this, having grasped the muffle by one ear with a hand or tweezers, it is lightly tapped on the table until the asbestos spreads throughout the muffle; the gold impression also descends with it almost to the very bottom of the muffle. To cover the free edges of the gold, the liquid asbestos is moved onto these edges with a blunt probe, leaving the edges of the cavity pressed into the gold foil free of asbestos, so that the asbestos lies in the form of a rim around the edges of the foil corresponding to the edges of the cavity. These edges will provide a clear direction for the future contours of the filling (Fig. 12). As little asbestos as possible should be taken, as a thick layer of it in the muffle requires significantly more time for firing. The asbestos-embedded impression must be well dried. However, asbestos hardens so slowly that it would take at least a day. Therefore, it is best to remove moisture from the asbestos with blotting paper, with which the edges of the asbestos in the muffle are lined. When all the papers become moist, they are replaced with others until they remain completely dry after contact with the asbestos. After this, the muffle is grasped with tweezers and passed several times over a spirit flame, whereby all the remaining moisture in the asbestos evaporates and it becomes dry and reliably fixes the impression. Layering and firing. Both these moments of work on manufacturing porcelain inlays are so connected with each other that they have to be described together. In a small mortar, better in a special glass cup, Jenkins' porcelain powder is dissolved with alcohol to the consistency of a liquid mass. Even if the mixture is very liquid, this is of no particular importance, as the excess alcohol quickly evaporates and the porcelain mass becomes dry. By adding alcohol drop by drop from a pipette, the necessary consistency of the mass is achieved again. When the mass is ready, it is picked up with a thin brush and applied in layers onto the foil inside the impression, and one should not fill the entire cavity at once, but do it gradually, in several steps, according to the size of the cavity. When layering the porcelain mass, it is very important to keep the edges of the impression adjacent to the asbestos in absolute cleanliness, so that after firing, there are no teeth, irregularities, etc., on the edges of the filling (Figs. 8 and 9). After applying the first layer of porcelain mass, one can proceed to firing. For this purpose, there are furnaces of different systems; it is best to use Mitchell's electric furnace with a rheostat and pyrometer (Fig. 18). The design of all furnaces has the same principle. A muffle with porcelain is placed in the furnace, it heats up quickly, and, when the temperature inside it reaches the melting point of the porcelain, the latter melts and gives a shiny, smooth mass. The melting point of Jenkins' mass is 850°. A major drawback of Jenkins' porcelain mass is its shrinkage after firing. This circumstance necessitates repeated layering of the porcelain mass and repeated firings. Usually, even small fillings require at least 3-4 layers and firings until all contours of the filling are fully reconstructed. Thus, by gradual layering and firing of the porcelain mass, it is possible to reconstruct from porcelain all missing parts of the tooth—angles of incisors and canines, as well as defects of the labial and buccal surfaces of other teeth. Jenkins restored deeply carious wisdom teeth with porcelain fillings, and these teeth were preserved for a long time (up to 25 years).
Strengthening the filling is also an important moment of the entire work. As soon as the firing is finished and the filling is ready, it is freed from the asbestos and gold foil; it is very important that not a single piece of gold, not a single point, remains on the inner surface of the filling, which could prevent the filling from seating well in its place. Usually, all the foil is easily removed with tweezers or a probe; often, however, one has to resort to drilling off the remnants of gold foil that have adhered to the inner surface of the filling, and here one must exercise special caution not to touch the thin edges of the filling with a small bur. It is suggested to place the filling in a glass test tube with aqua regia and hold the test tube over an alcohol flame until the aqua regia boils. In this process, the gold particles adhering to the filling dissolve. This method has negative properties: under the influence of aqua regia, the porcelain filling changes its color. When the entire filling is cleaned of gold, it is tried in the carious cavity; if there are any thin jagged edges on it or excesses on the inner surface that occurred under the influence of the gold foil breaking during the taking of the impression, they are easily ground off with thin carborundum disks. If the filling corresponds in every way to its cavity, i.e., if the edges of the cavity fit tightly with the edges of the filling, if the contour parts of the filling are correctly constructed and compensate for all defects of the tooth, then after checking the articulation, one can proceed to strengthening the porcelain insert with cement. For this purpose, several cuts are made on the inner surface of the filling with a diamond disk, and this surface is made rough. Likewise, it does not hurt to make anchor points or cuts in the cavity itself, wherever and however possible. All this will contribute to better fixation of the insert. It is best to make cuts on large fillings in a crosswise direction, and also slightly away from the edge of the filling (Figures 34-36). Then the carious cavity is well dried with alcohol and ether, filled with thinly mixed cement, and the insert is seated into it, pressing it to the bottom of the cavity with a finger or a special wooden stick. It is also possible to seat the filling-insert in place and press it to the walls of the cavity with an ordinary silk thread using a surgical knot (Fig. 39). Dahl-Gutman Inserts. The method of preparing porcelain inserts, according to Jenkins, is very painstaking and requires great skill and much time. Dahl inserts significantly simplify the process of porcelain filling. For this method, ready-made polished mineral fillings are used, fully corresponding in their luster and color to the porcelain fillings already described. Corresponding to each size of the inlays, there is a corresponding bur, with which the carious cavity is formed. This method is applicable on the labial and buccal surfaces of teeth. The complete Dahl set consists of 100 sorted, round inlays with attachments, 46 burs for straight and angle handpieces of the dental drill, 4 holders, 1 gauge, and 2 diamond disks (Fig. 19). The work methodology is simple. A bur of the necessary size is chosen, which would correspond to the size of the given cavity, and the cavity is prepared (Fig. 31). Corresponding to the size of the bur, an insert of the same size is taken and strengthened, like other inserts, with cement. The insert is usually grasped by the attachment from above (Fig. 40) and pressed into the cavity, lined with thinly mixed cement, until the excess of the latter is displaced from it. The insert itself already has cuts that facilitate its fixation in the cavity, and the very shape of the cavity already fully guarantees this fixation. After the cement hardens, the attachment of the filling is cut off with a diamond disk, and the filling is polished with stones and paper disks in the usual way. Gutman simplified the Dahl method by proposing his own mineral rods instead of ready-made mineral inserts. The method has the advantage that many fillings can be prepared from one rod, which are cemented into the cavity and polished like Dahl inserts (Fig. 17). Dahl-Gutman inserts, provided the cavity is located in a suitable place and is central, provide great savings in time during work and fully meet their purpose. The advantages of porcelain fillings consist first of all in the fact that they absolutely match in their color and have a shiny enamel surface, which makes them completely invisible: they are so smooth that food particles do not linger on them, and therefore recurrent (secondary) caries forms extremely rarely near such fillings. Among the indications for the use of such fillings, one must point mainly to considerations of a cosmetic nature. At the same time, it is necessary to emphasize that even on posterior teeth, especially in cavities extending deep under the gingival margin, porcelain fillings are irreplaceable. Unfortunately, however, porcelain fillings cannot be proposed for mass use due to the complexity of working with them. Combined fillings. At one time, it was proposed to mix amalgam with cement. Such a combination imparts to the filling material, on the one hand, the properties of cement—stickiness and rapid hardening—and on the other, the properties of amalgam: significant resistance to oral cavity secretions. Mixing is performed in two ways: either amalgam is added to already thinly mixed cement, or a certain amount of cement powder is added to the finished amalgam, and the entire mixture is thoroughly mixed with a small amount of liquid. The filling technique is the same as when using these materials separately.
Related articles
Mentioned in
Cite this page
“Fillings.” Soviet Medical Encyclopedia. English translation of Bolshaya Meditsinskaya Entsiklopediya, 1st ed. (Moscow, 1928–1936), ed. N. A. Semashko. https://sovietmedicalencyclopedia.pages.dev/article/fillings/