Microscopic Technique
Historical document, translated for reference. It reflects medical knowledge of the 1920s–30s and is not medical advice.
Summary
This article explains the proper handling and maintenance of microscopes, including cleaning procedures, protection from dust and sunlight, and warnings against disassembling optical components. It also covers the preparation of specimens for microscopic examination.
Encyclopedia article (1928–1936)
Microscopic Technique, in the narrow sense, is the technique of microscopy and contains rules for handling the microscope and auxiliary apparatus for the rational use of the optical properties and mechanical design of these instruments; in the broader sense, M. t. also includes the technique of preparing objects for microscopic examination, i.e., histological technique (see).
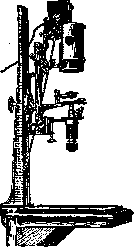
The first condition when working with a microscope should be the most pedantic observance of cleanliness; therefore, before starting work, it is necessary to inspect and, if necessary, thoroughly clean the optical and mechanical parts of the microscope. The same must be done after finishing work with the microscope. When cleaning optical glasses, it is necessary to use a clean old linen or silk rag, washed many times, so that no mineral particles that could irreparably damage the polished surface of the optical glasses can be found in it. Objectives must never be unscrewed under any circumstances, as this may disrupt the accuracy of centering and the distances between individual members of the system. When wiping the objective, its surface must be moistened with exhaled air; if this does not remove the contamination, then the rag can be moistened with gasoline or xylene, but certainly not with alcohol, and then thoroughly wiped dry. The mechanical parts of the microscope are best wiped with gasoline or clean kerosene; they should not be lubricated with any oil. In any case, even the mechanical parts of the microscope should not be unscrewed without extreme necessity, and it is better to entrust the necessary cleaning to an experienced mechanic or send the instrument to the factory. During non-working hours, the microscope should be carefully protected from dust, covering it with a glass cover or hiding it in the wooden case that comes with the microscope. The microscope should never be left under direct sunlight, especially in warm weather and in a southern climate, as this may cause the optical parts to overheat and the glasses cemented with Canadian balsam to separate from each other, which will ruin the objective and it will inevitably have to be sent to the factory for recementing.
When possible, one should always prefer a window facing north for the work table, since under such conditions natural daylight can be used almost all the time, which is easier on the eyes, and in the southern latitudes of the USSR allows for the use of natural light all day. Direct sunlight illumination is not suitable for the microscope, as it causes a number of inconveniences—entoptic phenomena in the eye, sharp diffraction circles, and dazzles the eyes. It is best to use diffused daylight from a brightly lit white wall or from a light cloud. When it is impossible to use daylight, and often specifically when examining objects, the light source: kerosene lamp, flame of a gas burner, electric light bulb. All such light sources give a yellow flame, and the colors of the preparation change their shades significantly. To avoid this, with artificial light, depending on the quality of the lamp, it is necessary to insert dark cobalt glass, transparent or frosted (if the light is very sharp), into a special holder of the illuminator. Among artificial light sources for the microscope, the best are special lamps with incandescent bulbs (half-watt) or the 'lilliput' arc lamp. The latter gives very good light, in its shade approaching daylight and requiring only the lightest cobalt glass (see Microscope). With certain instruments, special lamps are provided, connected to them. In microscopy, the absence of bright illumination of the work table (especially with the molecular microscope) must be considered a very important condition, as brightly lit objects on the work table, giving a bright image in the other eye, distract attention from the microscope picture even in an experienced microscopist. Therefore, the surface of the work table should be painted black or covered with dark paper. It is very convenient in the work table to make sliding shelves with edges for placing preparations in them—they do not collect dust, and there are no objects on the table that cause reflections. The chair before the table (preferably an armchair) should be of such a height that sitting is comfortable, as during intensive work one has to sit at the microscope for hours. For convenience in microscopy, the stand has a hinge for tilting; therefore it can always be tilted so that the observer's body is in a comfortable position. When using the molecular microscope, the second eye must necessarily be open, and the beginner should from the very beginning develop the habit of not paying attention to the visual images in the free eye. This is of very great importance, as with the free eye open, convergence and accommodation of the eyes are eliminated; consequently, the working eye remains at rest, and the sharpness of the contours is established by the micrometer screw without any participation of the eye muscles. Only under this condition is prolonged microscopy possible without eye fatigue. It is very useful to get into the habit of looking with both eyes alternately. If for some reason this proves impossible, it is better to get into the habit of looking with the left eye, then it is more convenient to draw the preparation while acting with the right hand and looking at the paper and pencil with the right eye. When using strong systems, as well as when examining with dark field illumination, it is useful to concentrate the beam of light from the lamp with the help of a condensing lens, placed separately or connected to the lamp itself, or with the help of the so-called 'shoe ball' (see Microscope). To illuminate the microscope more quickly, it is best to remove the eyepiece and, looking from above, catch the image of the light source given by one objective, and, by turning the mirror, bring it to the center of the field of view; then, putting the eyepiece back in place, one can be sure that the field of view of the microscope is illuminated, and one only has to adjust the mirror slightly to get uniform illumination of the entire field of view. When setting the mirror, one should follow the following rule: when illuminating with a beam of parallel light rays, i.e., from a distant light source, a flat mirror is used, and when the light source is located close to the microscope, i.e., when illuminating with a diverging beam of light rays, a concave mirror is used. A flat mirror does not change the path of the rays, and therefore the condenser, calculated in such a way that parallel rays are brought to a focus at a distance approximately equal to the usual thickness of the slide, will collect the rays in the plane of the preparation and give the best illumination; if the thickness of the glass is not quite suitable, it is easy to move the fine adjustment or the screw of the illuminator to bring the image of the light source to the proper place. With artificial illumination, the light source should be placed so that it is in the main focus of the concave mirror; then the rays will go from it as a parallel beam, and the illumination conditions will be similar to the previous one. In some cases, even with daylight, one has to use a concave mirror: when the binding of the frame is so dense that it is drawn in the field of view of the microscope, or when there are objects in front of the window that cannot be removed and are projected into the field of view of the microscope. Observance of the said rule regarding the mirror is especially important when using strong systems—dry and immersion. In the absence of a condenser to concentrate the light, it is better to use a concave mirror. The objective and eyepiece should be chosen according to the purpose of the research; when studying the general plan of the structure of an organ (and this is how microscopic research should begin), one should use an objective with a long working distance and a wide field of view. The eyepiece should also be weak, so as not to narrow the field of view of the objective. For especially large fields of view, special eyepieces with a large front lens are made; in diameter they do not fit the ordinary draw tube of the microscope, and for their use this tube has to be unscrewed and the entire eyepiece screwed in its place. When moving to the study of small details of the preparation, a strong objective is changed, but it is preferable to leave a weak eyepiece, unless the eye is able to clearly distinguish the details of the picture drawn by the objective. Only for very small details can strong eyepieces be used, and then only if the objective has very good correction in terms of eliminating spherical and chromatic aberrations. In this respect, apochromats deserve special attention, which can be used with the strongest eyepieces. However, the choice of eyepiece depends to a large extent on the individual characteristics of the researcher. Some prefer strong eyepieces. When using strong objectives with large apertures (above 1.0), to fully utilize the resolving power of the objective, a drop of cedar oil must be placed between the condenser and the slide; objectives with high apertures of 1.30 and 1.40 also require a condenser with an aperture of 1.40. When receiving new objectives, they should be checked for the degree of correction and aperture size. To test the correction of an objective, the Abbe test plate is used, made by the Zeiss firm. It is a slide on the silvered surface of which wide light strips with toothed edges are drawn, covered with cover glasses of different thicknesses, from 0.10 to 0.25 mm, or with one narrow and long glass, the thickness of which changes from left to right from 0.10 to 0.25 mm (new model). To check spherical and chromatic correction, set up the test plate, choosing the thickness of the cover glass that is engraved on the objective's mount, usually 0.17 mm, and the tube length adopted by the given firm. With full correction, the black strips will be seen completely sharply and without any colored edges. With oblique illumination in achromats, a yellow-green fringe will be visible on one side, and on the other—violet, purple, and pinkish, but the edge will remain sharply defined. If spherical aberration is not completely eliminated, the edge will appear blurred. It may turn out that this blurriness disappears with a different thickness of the cover glass; in that case, the indication on the objective regarding the thickness of the cover glass is incorrect, and it should be corrected. To a weak degree, incorrect correction can be compensated by lengthening or shortening the microscope tube; to a greater degree, this is achieved by rotating the correction ring, if such exists. In the case of an apochromat, there should be no colored fringes at the edge even with oblique illumination. For setting oblique illumination in large illuminators, there is a fine adjustment that allows moving the diaphragm out of the center. The degree of oblique illumination can be easily controlled by removing the eyepiece and looking into the microscope from above; at this time, the illuminated circle in the field of view of the microscope should be visible at the edge of the field of view. To determine the aperture of the objective, a special instrument built by Abbe and called the apertometer is used. It is a thick plate of mirror glass, the rear edge of which is ground at an angle of 45°. The front edge, ground at a right angle, forms a semicircle, the center of which is occupied by a silvered circle with a transparent middle.
Along the edge move two arrows, their points facing each other. Divisions are marked on both sides of the center line, showing numerical values of the aperture. Place the apertometer on the microscope stage (without mirror) and illuminate its front edge with a lamp as shown in the figure (Fig. 1). Move the arrow points until they touch along the center line. With the usual arrangement of the eyepiece and objective, set the silver disk of the apertometer with a transparent center so that both points are visible exactly in the middle. Now, without changing the setting, remove the inner drawtube of the microscope and screw into its lower end a special system provided with the apertometer, thereby forming an inner, or auxiliary microscope. By raising and lowering the inner tube, find a sharp image of the inner disk of the apertometer and the ends of the arrows. Since the rear edge of the apertometer is cut at a 45° angle, total internal reflection occurs here and the rays travel as if the entire apparatus is located on the axis of the microscope. Now, begin to uniformly spread the apertometer arrows apart until their ends touch the edges of the field of view. Looking at the divisions of the apertometer, we can directly read the aperture of the objective being tested. The thickness of the slide glass in ordinary diascopic research does not play a special role, but in research with dark field illumination it must be precisely matched with the focus of the condenser, because the crossing of rays must necessarily occur in the plane of the preparation, otherwise many reflections will appear, distorting the image. The thickness of the cover glass, on the contrary, strongly affects the quality of the image, causing the phenomenon of aberration (see Microscope), which is why, especially with strong systems, glasses of corresponding thickness should always be selected. For a complete characterization of an objective, it is necessary to check to what extent it is able to transmit fine details of structure, i.e., its resolving power. Trial objectives for this purpose are Nobert's or Grayson's plates with systems of lines applied to glass with a diamond. The systems are designated by numbers, and in the densest system the lines are spaced at an interval equal to 0.2 μ. Sets of diatom frustules made by Möller are also very convenient. In them, diatoms of varying fineness are arranged in one row, starting from Triceratium favus to Amphipleura pellucida, in all 20 numbers. By proceeding from the coarsest diatom to finer ones, it is possible to determine the quality of the system being tested and its resolving power. A good oil apochromat should resolve all diatoms (the latter with oblique illumination). (Limits of resolution for different objectives—see Microscope.)
Monocular microscopic examination even for experienced microscopists causes considerable fatigue. The introduction of the double tube into microscope manufacturing technique represents a very significant improvement in this regard. When setting up the preparation with a binocular attachment or tube (better), the same rules should be followed as in monoscopic microscopy; if there is a difference in the refraction of the eyes, each eyepiece should be adjusted so that the image is clearly visible to each eye separately, for which a screw thread is provided in one of the eyepieces, bringing the eye lens closer or farther away. It is also necessary to accurately set the distance between the centers of the eyepieces according to the distance between the centers of the observer's pupils. Under these conditions, stereoscopic effect, to the extent possible with one objective, and complete rest for the eyes are obtained. Less convenient for binocular microscopy with one objective are the Reichert and Leitz binocular attachments and Zeiss's 'bitukni.' The Reichert and Leitz attachments, inserted in place of the eyepiece, lengthen the microscope tube, which creates inconvenience for the position of the observer's body and significantly burdens the microscope tube. Zeiss's 'bitukni' is more convenient because it is set obliquely and therefore provides more comfort for the position of the body, and in addition it screws in place of the drawtube and does not lengthen the microscope tube as much. The Reichert attachment is equipped with two systems of terminal converging lenses facing the objective: one for the compound microscope and the other for using the attachment as a binocular loupe, for which a special heavy stand is optionally provided, allowing it to be used without a microscope stand (as a dermatoscope, dissecting loupe, etc.).
When examining opaque objects, to study their surface, weak systems are illuminated with a concentrated beam of light passed through a condenser lens located above the microscope stage. Vertical illuminators (opaque illuminators) are more convenient to use. Since ordinary objectives are mounted in such a way that when screwed into the nosepiece their focal planes coincide, they are generally not suitable for microscopy with a vertical illuminator, and for this purpose objectives with a short mount should be used, since only under this condition is proper image brightness obtained. If, however, it is necessary to study a surface not covered with a cover glass, then an objective should be chosen in which the calculation has been made for the absence of a cover glass. For research with upper illumination, it is necessary to have a sufficiently bright light source that can be installed at the same level as the vertical illuminator and enclosed on all sides except the one facing the instrument. Some firms, for example Reichert, include the light source in the form of a compact low-voltage bulb directly in the instrument. After setting the light source so that the beam of rays goes horizontally directly into the mirror of the vertical illuminator with a certain combination of objective and eyepiece, the objectives can then be changed, provided the difference between their focal lengths is not too great. Otherwise, the setup must be done anew. This is especially necessary if the objects of study differ greatly in thickness. But the lighting setup for vertical illumination is quite troublesome, and in recent years stands have been produced in which the microscope stage can be lowered and raised by means of a rack and pinion, and then secured with a clamp, which is very convenient.
For research in dark field illumination, a whole series of condensers and special ultramicroscopes are used. The latter instrument, which sends light into the preparation at a right angle to the axis of the microscope, is almost completely unsuitable for studying histological and bacteriological preparations; it has found application in colloid chemistry and in the study of solutions. For purely microscopic purposes, only special condensers are suitable (see Microscope). When proceeding to research in dark field illumination, it is necessary to place a drop of cedar oil under the slide glass, between it and the illuminator, to make the medium between the glasses homogeneous and to avoid deviation of the rays that have passed through the condenser and are traveling at such an angle to the surface that the phenomenon of total internal reflection may occur. After setting up the preparation, it is necessary to choose the proper position for the mirror and for the distance between the slide glass and the condenser. For this, illuminating the microscope mirror so that its center is brightly lit, set the proper position for the mirror and illuminator with a weak objective and eyepiece. It is necessary that in the center of the field of view of a weak system a light circle be clearly visible, as shown in the accompanying figures (Figs. 2 and 3). Having thus set up the illumination, one can
Figure 2.
Figure 3.
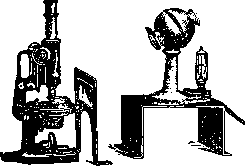
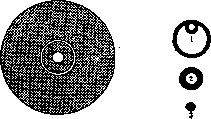
Figure 2. Illumination in the field of view. Figure 3. 1-incorrect position of the mirror; 2-incorrect position of the condenser; 3-correct illumination. One can then proceed to the objective with which it is planned to conduct observations. Precise adjustment to a high degree contributes to the clarity of the image and eliminates the strongly interfering reflections and circles of light scattering. With precise adjustment and correspondence of the objective aperture to the condenser used, the image becomes so clear that it is possible to examine and even photograph in living condition the cell organelles (e.g. mitochondria). The effect of dark field and a very clear image can be obtained, especially with weak systems, without a special condenser. For this, a central diaphragm is placed in the holder of the illuminator's diaphragm instead of the iris diaphragm, allowing only marginal rays to pass into the objective, i.e., blocking the absolute maximum (see Microscope). With a suitably chosen central opaque disk and weak objectives, an image is obtained whose purity leaves nothing to be desired. The same effect is achieved by blackening the central part of the objective's front lens or by inserting a central diaphragm into the objective in place of the image of the light source (as in experiments with Abbe's plate). The latter two methods of obtaining dark field vision, however, are not convenient, and it is much better to use appropriate condensors. Research in dark field vision gives very much when examining fresh and living objects. Thus, it is possible to detect microorganisms in a liquid and observe their movement, study tissue cultures, make ordinary photomicrographs, and also produce motion pictures. Research under conditions of light polarization-see Polarization. In experiments with ultraviolet rays, all the above-mentioned equipment, as well as the condenser, must be made of quartz, as glass does not transmit ultraviolet rays. For studying fresh and living objects and for experiments with them, there are a number of devices: hanging drop (see), moist chamber, microaquarium, electric chamber, and for cells of warm-blooded animals-warming stages and warming microscope. To set up a moist chamber, used for studying any films from the body of animals, e.g., the frog's mesentery, a cork disk or plate with a hole is taken, the edges of which are stretched with a film, covered with a coverslip. To prevent drying, a slow current of liquid is led to the preparation or it is surrounded by strips of filter paper moistened with physiological solution or Ringer's solution, isotonic with respect to the object being studied. The microaquarium is a small flat reservoir (glass). For this purpose, it is best to attach on a ground slide using Canadian balsam or Mendeleev's putty a quadrangular or circular low frame with a polished upper edge, on which a coverslip is applied, also greased with fat or vaseline. Holes should be made in the frame, through which thin tubes for the inflow and outflow of liquid are passed. Since the microaquarium is usually set up for studying moving objects, the medium used varies depending on the speed of movement. When studying slow movements, ordinary aqueous solutions of salts or organic compounds, as well as natural body fluids of the animal being studied, can be taken; if the movements are very fast, it is useful, and sometimes necessary, to make the medium more viscous to slow down the movement. For this purpose, a greater or lesser amount of mucus is mixed into the water, e.g., tragacanth, agar, or a neutral gelatin solution. In such a medium, movement is greatly slowed down, making it possible to study its various phases. For studying the effect of electric discharges, conductors soldered into the wall are added to one of the above-mentioned devices for connection with simple (preferably platinum) or non-polarizable electrodes. The above-mentioned devices for studying living objects can be placed on a warming stage or in a Zeiss warming cabinet together with the microscope. The best and most convenient stage is the Leitz warming stage, which makes it possible to regulate the temperature as needed-to heat with electric current or to cool with liquid CO2 (for which a well-functioning reduction valve is essential, allowing current to pass under very low pressure). The above-mentioned equipment makes it possible to use vital stains (see) and to conduct experiments either directly by hand or with the help of a micromanipulator (see). Fresh material for studying isolated elements can be directly teased apart on a slide with dissecting needles. Covering it with a coverslip, test solutions can be passed from the side by applying well-cut pieces of filter paper to the edge of the coverslip. By sucking the liquid from under the coverslip with such a paper, the test solution or desired dye can be introduced. The material to be fixed is examined either in the teased state or on sections, stained according to the purpose of the research. (Methodology of isolation, fixation, preparation of sections and staining of specimens-see Histological technique.) When studying bacteriological material, special stains are used, the recipes and methodology of which are described in microbiology reference books. When studying unstained specimens, the elements of which are visible only due to the difference in refractive indices, it is necessary to use a narrow diaphragm to obtain the sharpest contours of the diffraction image. In addition, the medium for mounting the specimen should have a low refractive index, because otherwise the entire difference in refractive indices disappears and the details will not be visible. Such mounting media are water, diluted glycerin (pure or acidified), levulose, glycerin-gelatin. Specimens mounted in such a medium must be for storage framed with asphalt varnish or special alcohol varnishes sold ready-made. Asphalt varnish, sold in a thick state, must first be diluted with xylene or turpentine to the consistency of liquid syrup. When wishing to preserve an interesting specimen for a long time, a frame of such width is applied with a brush or stick along the edges of the coverslip so that it completely covers the edges of the coverslip and the adjacent part of the slide; it is better to make the frame wider and less elegant than to underfill the edges and risk drying out the interesting specimen. When studying brightly stained specimens, the illuminator's diaphragm should be taken wide, however, not so wide that the contours of the specimen are blurred. Since brightly stained specimens are usually mounted in Canadian balsam or dammar resin dissolved in xylene, which evaporates quickly, the application of a frame is unnecessary and only needlessly dirties the specimen. When studying a specimen, it is sometimes necessary to sketch interesting parts of it. In the simplest case, this can be done directly by eye, and some micro-painters always draw this way, but a non-artist can use this method only for sketching outlines, plans, and notes. For more careful sketching, drawing eyepieces or Abbe's special drawing apparatus (see Microscope) are used, as well as a camera lucida attached to the eyepiece. These devices make it possible to simultaneously see both the microscopic image and the tip of the pencil on paper. When using them, only the outlines are drawn on the paper, while the detailed drawing is more conveniently done along the outlined contours without the apparatus. The apparatus according to Vasiliev is very convenient for sketching. With the help of a flat mirror in a frame, placed obliquely, with an inclined microscope stand, the specimen can be projected onto paper and its contours accurately drawn (see Microscope). A more complex apparatus for the same purpose is Edinger's embryograph. For sketching the microscopic image projected onto paper, it is necessary to shield extraneous light with screens, and it is even better to work in a dark room; then all details are well visible and easy to sketch. The most objective way of reproducing a microscopic image is considered to be photomicrography (see). Finished specimens should be stored in special boxes or folders that protect them from dust and the action of light, from which dyes can fade. Each specimen must be provided with a label with a number or a description of the treatment, staining, and origin of the material. When conducting microscopic research, it is very useful to keep a work journal in which is noted when and what was taken for research, how it was fixed, how the sequential processing was carried out up to staining and the medium in which the section is mounted, as well as what was found in such a specimen. The prepared material can be stored for varying times depending on the properties of the material itself and its treatment. In alcohol, specimens can be stored for a very long time (years), especially after fixation with formalin, but old material usually stains worse than fresh material.
The material is preserved better if 10-15% pure glycerin is added to the alcohol. Objects embedded in paraffin can be preserved without any changes for an indefinitely long time. Celluloid embedding is not suitable for long-term storage, especially if the pieces are mounted on wooden or cork bases. Celluloid blocks, when stored in alcohol, after some time become acidic due to the decomposition of celluloid, and in addition, tannins are extracted from the wood or cork, as a result of which the sections either do not stain at all or give a distorted coloration. Blocks (without wood) are preserved longer if 10-15% pure glycerin is added to the alcohol. However, celluloid blocks can also be made stable and capable of withstanding indefinitely long storage if, immediately after the celluloid has hardened, they are impregnated with turpentine in 70% alcohol. For this purpose, blocks from 70% alcohol are transferred to 90% alcohol, changing it two or three times; after that, they are suspended in a tall cylinder in a mixture of two parts absolute alcohol and one part chloroform. The next day the mixture is changed, and then, after transferring the embedded material to turpentine, it is left in an open dish for a day and on the following day transferred to a fresh portion of turpentine. After 2-5 days, depending on the size of the pieces, they are removed and stored in a jar with a good cork, placing under and over them a wad of cotton wool soaked in turpentine. When cutting such pieces, the microtome knife is also moistened with turpentine, and the sections can be conveniently stored between sheets of thin smooth paper soaked in turpentine. Throughout the entire described process of transferring to turpentine, it is necessary to ensure that the blocks remain completely transparent at all times.
Related articles
Mentioned in
Cite this page
“Microscopic Technique.” Soviet Medical Encyclopedia. English translation of Bolshaya Meditsinskaya Entsiklopediya, 1st ed. (Moscow, 1928–1936), ed. N. A. Semashko. https://sovietmedicalencyclopedia.pages.dev/article/microscopic-technique/